mrad31
Member
Although I completed this project over a year ago I figured I would share some photos and some details of the project. One thing to know about me is that I like lighting and tinkering with it. Three things I found lacking on the Telluride is the lack of rear fog, footwell and of course the topic of discussion puddle lights!
So initially, I made all the plans up fully intending on installing them in the side mirrors. On the day of installation I noticed the mirrors are kind of tapered (where the light would shine outward more than I'd like) and even worse they lacked the clearance inside to permit the LED bolts I had on hand without serious modifications. Compromising, I went for the front door panels.

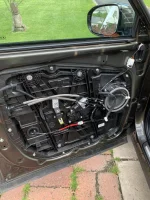
The door panels are very easy to remove, the hardest part is dealing with disconnecting and reconnecting the door handle actuators. Proceeding, I removed the door panels, drilled some holes on the bottom with a step bit and well wired them up. I know, I know to what? Well I wanted them to function just as the door pocket lamps (those little LEDs in the front two door handles). That is, be apart of the approach lighting. These activate when you shut off the vehicle and if selected in the menu, on approach of the key fob. (Yes would have been cooler in the mirrors, but whatever still have them nonetheless).
So the signals sourced were in the 6 position connector (part of the main door harness) near the door handle. For MY20 these were pins 5 (Brown/Orange) and 6 (Black) for the Pocket Lamp signal and a Ground respectively. Of course, wire color and location can change especially across trims and now model years, so I would encourage you to take a look for yourself on Kia's tech info site if you're interested into digging into stuff like this. It's not free, but a small price to pay for specific planning on projects like this.
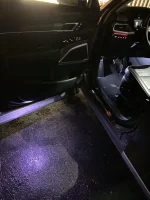
Anyway, here is the result. Still functioning great and suite their purpose. There are battery options available too, but I prefer hardwired.

So initially, I made all the plans up fully intending on installing them in the side mirrors. On the day of installation I noticed the mirrors are kind of tapered (where the light would shine outward more than I'd like) and even worse they lacked the clearance inside to permit the LED bolts I had on hand without serious modifications. Compromising, I went for the front door panels.

The door panels are very easy to remove, the hardest part is dealing with disconnecting and reconnecting the door handle actuators. Proceeding, I removed the door panels, drilled some holes on the bottom with a step bit and well wired them up. I know, I know to what? Well I wanted them to function just as the door pocket lamps (those little LEDs in the front two door handles). That is, be apart of the approach lighting. These activate when you shut off the vehicle and if selected in the menu, on approach of the key fob. (Yes would have been cooler in the mirrors, but whatever still have them nonetheless).
So the signals sourced were in the 6 position connector (part of the main door harness) near the door handle. For MY20 these were pins 5 (Brown/Orange) and 6 (Black) for the Pocket Lamp signal and a Ground respectively. Of course, wire color and location can change especially across trims and now model years, so I would encourage you to take a look for yourself on Kia's tech info site if you're interested into digging into stuff like this. It's not free, but a small price to pay for specific planning on projects like this.
Anyway, here is the result. Still functioning great and suite their purpose. There are battery options available too, but I prefer hardwired.


