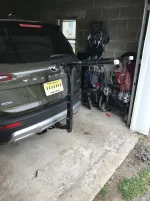
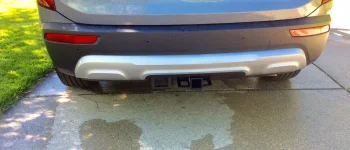
I installed the factory hitch yesterday and wanted to add a few comments to this thread in case others go for it as well. Apologize for the lack of photos, but once you start the install these descriptions will make sense. Sorry for the long post, but I'm just trying to be helpful here
I agree with the original post: it's a straightforward install that took me a couple hours doing it in sort of a leisurely way while I was doing other stuff in the garage.
Tools:
-I found that to handle a few of the tough to access bolts above the exhaust that I ended up using a few different socket attachments (extensions, universal joints, different socket/ratchet combos), so if you've just got some tiny socket set it's going to be tough. All of those types of attachments for socket sets will save you so much pain on so many projects...if you're wrenching on anything substantial you should invest in that stuff for sure.
-Because there's a safety issue here, I made sure and used a torque wrench to torque the bolts down to the factory specs in the instructions. Some of these bolts get torqued pretty tight, so I wouldn't recommend doing this unless you have a long torque wrench....just cranking them down with a standard ratchet isn't going to cut it IMO. I'm just using it for bikes, but the next owner might be towing a boat down the highway in front of somebody's family...
-Contrary to what the instructions say, you don't need to jack the car up. Granted I'm a normal sized guy, so your experience may vary if you're on the big side. I was able to put the hitch on my chest and slide back under the car on a piece of cardboard to push it up into place for those first couple bolts. It's not hard to do that step, because once you get the hitch up above the muffler, the muffler holds that side up while you put a bolt in the other side. However, I did end up using my huge floor jack to take the weight of the hitch while I was having to move it around to line up bolt holes in later steps....but you could just use a helper for that if you don't have a rolling jack.
-You don't need a clip removal tool for those plastic bumper push clips like the instructions say, all you need is a small screwdriver to stick in and rotate slightly to get those push clips out. If you break one, they are at every auto parts store so don't worry about it.
-You don't need an exhaust hanger tool like the instructions say, all you need is a series of screwdrivers, some muscle, and patience to pry those #$$##@ rubber hangers off. You'll need to take off the rubber hanger by the back bumper as well as the one near the rear differential so the exhaust drops low enough for bolt access.
-I did the wiring kit as well, and for that and the somewhat fussy plastic trim removal/install, I found using my camping headlamp worked well to see what I was doing.
Install:
-Lowering the spare tire: it seems intuitive that to lower the tire you would turn the socket counter clockwise....it's the opposite though. "Tighten it" to lower it. Odd.
-Removing the plastic bumper trim is a little fussy. You have to sort of carefully manhandle the corners off, then I found using a long thin flat blade screwdriver to 'release' the row of clips along the rear-most edge one at a time worked best.
-I didn't need to use a thread cleaner at all, but you might...each car will be different.
-See note about exhaust hangers above...even with the two rubber hangers off, it's only going to drop a little bit
-You don't need to bend the bumper alignment post very much at all. I actually used the rubber coated handle of big vise grips to sort of pry it away from the framerail maybe 1/4-1/2" and that was enough. Don't use metal on metal to pry it, you don't want to put deep scratches in the paint and have a rust issue down the road.
-The wiring kit: This part was odd. You carefully cut the wire loom zip tie thing (the zip tie thing, NOT the wire!) which is attached to one of the studs, then unscrew that plastic loom holder you just cut off of that post. The kit included a nut to put back onto that post to hold the wiring box on, but it straight up is the wrong sized bolt. I ended up trimming a little bit of the square corners of the previously-cut plastic loom holder off, then jamming that back on the stud to hold the wiring box on, worked great and with the included double sided tape I don't think it's going anywhere. Frustrating step. Will make sense when you see it, or maybe you'll get lucky and the the right nut. Also, the drawings that show how the plug attaches to the hitch assembly right near the hitch receiver are not intuitive or 100% correct...you'll need to play around a bit and figure it out. I makes sense once you start assembling it, but take those drawings with a grain of salt.
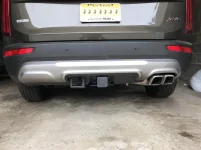
-The main hitch attachment bolts: The drivers side is a piece of cake. The passenger side is a PITA due to the exhaust. Have patience and you'll get it. Lots of squeezing hands and ratchets into tight spots on this one. Honestly it would be way easier to just drop the rear exhaust section, but if you did that you probably want to replace the exhaust gasket there and I just didn't want to deal with it.
-TIP: when it came to torquing down the 7/16 bolts above the muffler, I found a solution that worked to give me access for the long torque wrench. Take a tie down, loop it around the exhaust tips and then attach the strap ends to the main hitch area. Then pull the strap tight....this will pull and hold the muffler over to the drivers side just enough so you now have room to get a full 180 degree-ish spread on each turn of the torque wrench...assuming you have a long enough socket. You'll understand when you get there.
That's about all, the rest is pretty easy. Not a difficult install if you have tools and some time. Good luck, and enjoy that money you saved by doing it yourself.
-J


 piece of
")