• Hint: Use a descriptive title for your new message
    If you're looking for help and want to draw people in who can assist you, use a descriptive subject title when posting your message. In other words, "I need help with my SUV" could be about anything and can easily be overlooked by people who can help. However, "I need help with my transmission" will draw interest from people who can help with a transmission specific issue. Be as descriptive as you can. Please also post in the appropriate forum. The "Lounge" is for introducing yourself. If you need help with your leather interior, please post in the Interior section - and so on... This message can be closed by clicking the X in the top right corner.
  • Car enthusiast? Join us on Cars Connected! iOS | Android | Desktop

Aftermarket trailer hitch

Eighttrucktires

New member
Joined
Nov 6, 2019
Messages
1
Reaction score
0
Points
1
I see that curt makes a hitch. However I don't find a wiring harness or instructions to run the plug for trailer lights. Anybody have any suggestions? Thanks! (I just got a white LX AWD Monday:)
 
Last edited:
I see that curt makes a hitch. However I don't find a wiring harness or instructions to run the plug for trailer lights. Anybody have any suggestions? Thanks! (I just got a white LX AWD Monday:)

etrailer.com has everything you will need.
 
I have been looking at the Curt hitch instead of the factory hitch. I used a Curt hitch on my Sienna, and I was very impressed with it -- heavy duty construction, well designed, excellent fit. The curt hitch is considerably less expensive than the factory hitch, so that's probably the way I will go....but there are some issues.

1. It appears to hang lower than the factory hitch (just the receiver part, not the cross tube which remains hidden) I don't think this is an issue by itself, but it might lead to other issues (like if I wanted to use the factory cover / trim piece with the hitch)
2. It doesn't appear to have a provision for mounting the trailer wiring plug. I want a permanently mounted 7 pin connector that integrates reasonably well, so I would have to figure this out somehow.
3. Getting the wiring sorted out...

My plan for the moment is to get the hitch and install it, then figure out how to mount the 7 pin connector to the left side of the cross tube. I can do minor fabrication if necessary, but I don't want to do too much. I haven't found a great option for this yet, but I have hope.

As for wiring, I did find a Tekonsha direct-fit wiring harness. It plugs directly into the factory harness and includes a powered converter box. Unfortunately it's pretty expensive at $235:


And I did find it for much cheaper ($50) and it appears to be the same exact thing...but why such a price discrepancy?


And, finally, I would have to add a true 7 pin wiring plug because I need the connector for the electric brakes (and while I'm at it, trailer power to charge the battery). If I feel ambitious I might even try to get the reverse lights hooked up (probably not)


If I move forward with this I will post pictures/updates.

-Steve
 
I ended up buying the curt hitch from Cardiff.com ($190 with tax / shipping included)

I bought the Tekonsha trailer 4 pin adapter from trailer jacks.com ($50 shipped).

I think those two things will go pretty well. Installing the brake controller and running the (heavy gauge) wiring to the back might be a bit more involved.

I am also considering installing some air lift “springs” in the case that the rear end sags...which it probably will. I did this on my sienna and it helped significantly, and it’s pretty inexpensive compared to the self leveling suspension upgrade.
______________________________
 
That should have said carid.com


I have everything I need at this point. Hitch, 4 way wiring adapter (Tekonsha), wiring for brakes+aux power (etrailer.com), and a brake controller (Tekonsha prodigy). I’m getting ready to install it all right now, I will take pictures and do may do a write up if sorts, but there is already a really good write up from another user...

So far everything looks to be high quality - definitely impressed with the curt hitch. It is massive.

More later.
Would love some pics. Considering spending the extra $$ for the Stealth hitch. Depends on how the Curt looks. I agree that Curt's are well made hitches. I've had a couple on different vehicles.
 
I can post more details later. Here is the quick version:

The curt hitch is well made. Getting it in place and the bolts started was easy. Torquing everything down was a pain - but that’s probably mostly my fault because I took a “shortcut” of only removing the rear two exhaust hangers. If you remove the third hanger, you have to support the exhaust somehow, which I didn’t want to mess with. (And I was too stubborn to admit I was wrong, so I just suffered through. )

I bought the screw band clamp type add-on mounting bracket for my 7 pin connector. (The curt hitch doesn’t have a welded in bracket like some applications). This worked pretty well.

The Tekonsha wiring adapter was super easy.

I had to cut out some clearance holes for the receiver and the 7 pin connector. More on that later.

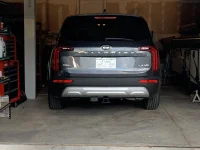
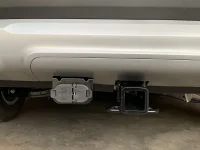
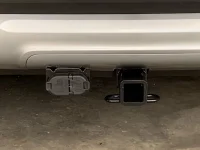
I briefly considered the stealth hitch, but I figured $190 (including tax and shipping) for the curt was too good to pass up. I think the installation looks pretty clean, and I don’t really mind the receiver and wiring plug showing.


56D59BDE-3392-4F17-B38E-1F9902033743.webpEDF2FBC2-8639-4FF2-9DBE-824EEF42E4D5.webp4899E40D-BB07-4970-9947-27E30C351CB8.webp
 
A few thoughts about installing the hitch.

1. Watch the eTrailer installation video. It’s helpful.

2. The hitch trim piece does just come loose like in the video. It looked like there were tabs that I had to press with a screwdriver, but that wasn’t the case. Just “peel” it away like in the video.

3. The curt hitch (and I presume others) install in a way that I’m not totally comfortable with. The horizontal bolts (the M12 ones) don’t actually clamp the hitch to the frame. The hitch spacing is such that it doesn’t quite touch the frame rails. When you tightened the bolts, it deflects the flat pieces some (so that they get closer to the frame rails), but they never really touch as far as I can tell. As a result you are relying on the other small vertical bolts and the shear strength of the long bolts to keep the hitch attached. The way I understand it, the primary force that you usually rely on is the friction between the two flat pieces of metal. The bolts usually supply the clamping force between the two pieces (which results in the friction at the interface). In this case there doesn’t really seem to be an interface, hence we rely on the shear strength of the bolts (which I don’t think is the normal use case for bolts). Hopefully we have a structural or mechanical engineer on board who can comment.

4. The compartment on the left side of the car (where the wiring connects) is a nice convenient area to hide all the wiring, splices, etc. I like it.

I did the work without lifting the car. Jacking it up 6-10 inches might help some, but probably not a lot. Working on a lift would certainly be easier.

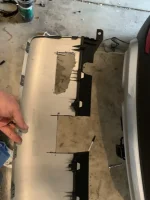
I cut some clearance holes / slots for the receiver and the electrical connector and bracket. For the bracket I actually did two different cuts / holes in order to maintain the integrity of the rear (black) trim piece. I was afraid that if I cut in the same wat I did for the receiver, there wouldn’t be enough of the black material to hold it in place. See pictures below.

I still need to run the brake controller wiring along with the six power. That’s a bit of a project, maybe I will tackle it tomorrow or next weekend.

The first picture shows where I marked the cutout for the receiver part. I could have made it a little tighter, but it’s fine with me. The cuts on this area are mostly concealed, but can be seen if you are up close and low.

The second picture shows the cutouts for the electrical connector. The hole is a bit asymmetrical because the plug itself (on the back side) is deeper on one side. The cutout in the back is to clear the circular wiring harness that exits the plug. Again, I kept the black trim piece continuous at this point so it would stay together better. These cuts are mostly concealed. The top / rearmost cut is somewhat visible, but again only if you are close and low.

I had to feed the bracket through the hole as I installed the trim piece. Only after it was in place did I put the (snap in) connector into the bracket, and the (snap in) wiring harness into the back side of the plug. If those two components weren’t detachable, I would have had to cut a continuous hole to clear the whole plug/bracket/wiring contraption.

I hope this is helpful to someone.
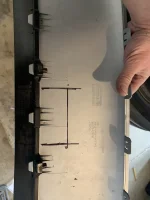


BD8EB920-1CD7-4313-8917-A222667553A1.webp88F1994E-1A87-4E62-81D3-C5CE4310BF13.webp
______________________________
 
Nice work, looks pretty good, maybe better than the factory set up.....tough call on the Curt vs Stealth. Cost difference is around $300. My use would be fairly infrequent so it might be nice to keep it hidden/clean, but that's not bad looking!
 
Last edited:


Back
Top