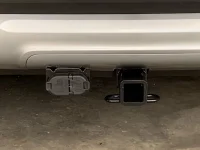
A few thoughts about installing the hitch.
1. Watch the eTrailer installation video. It’s helpful.
Call etrailer.com at 800-298-8924 for expert service. We are your Kia trailer hitch experts, and offer a lowest price guarantee. etrailer.com carries

www.etrailer.com
2. The hitch trim piece does just come loose like in the video. It looked like there were tabs that I had to press with a screwdriver, but that wasn’t the case. Just “peel” it away like in the video.
3. The curt hitch (and I presume others) install in a way that I’m not totally comfortable with. The horizontal bolts (the M12 ones) don’t actually clamp the hitch to the frame. The hitch spacing is such that it doesn’t quite touch the frame rails. When you tightened the bolts, it deflects the flat pieces some (so that they get closer to the frame rails), but they never really touch as far as I can tell. As a result you are relying on the other small vertical bolts and the shear strength of the long bolts to keep the hitch attached. The way I understand it, the primary force that you usually rely on is the friction between the two flat pieces of metal. The bolts usually supply the clamping force between the two pieces (which results in the friction at the interface). In this case there doesn’t really seem to be an interface, hence we rely on the shear strength of the bolts (which I don’t think is the normal use case for bolts). Hopefully we have a structural or mechanical engineer on board who can comment.
4. The compartment on the left side of the car (where the wiring connects) is a nice convenient area to hide all the wiring, splices, etc. I like it.
I did the work without lifting the car. Jacking it up 6-10 inches might help some, but probably not a lot. Working on a lift would certainly be easier.
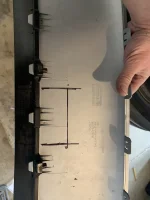
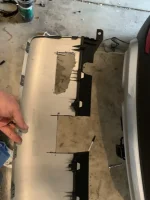
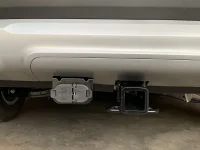
I cut some clearance holes / slots for the receiver and the electrical connector and bracket. For the bracket I actually did two different cuts / holes in order to maintain the integrity of the rear (black) trim piece. I was afraid that if I cut in the same wat I did for the receiver, there wouldn’t be enough of the black material to hold it in place. See pictures below.
I still need to run the brake controller wiring along with the six power. That’s a bit of a project, maybe I will tackle it tomorrow or next weekend.
The first picture shows where I marked the cutout for the receiver part. I could have made it a little tighter, but it’s fine with me. The cuts on this area are mostly concealed, but can be seen if you are up close and low.
The second picture shows the cutouts for the electrical connector. The hole is a bit asymmetrical because the plug itself (on the back side) is deeper on one side. The cutout in the back is to clear the circular wiring harness that exits the plug. Again, I kept the black trim piece continuous at this point so it would stay together better. These cuts are mostly concealed. The top / rearmost cut is somewhat visible, but again only if you are close and low.
I had to feed the bracket through the hole as I installed the trim piece. Only after it was in place did I put the (snap in) connector into the bracket, and the (snap in) wiring harness into the back side of the plug. If those two components weren’t detachable, I would have had to cut a continuous hole to clear the whole plug/bracket/wiring contraption.
I hope this is helpful to someone.
