• Hint: Use a descriptive title for your new message
    If you're looking for help and want to draw people in who can assist you, use a descriptive subject title when posting your message. In other words, "I need help with my SUV" could be about anything and can easily be overlooked by people who can help. However, "I need help with my transmission" will draw interest from people who can help with a transmission specific issue. Be as descriptive as you can. Please also post in the appropriate forum. The "Lounge" is for introducing yourself. If you need help with your leather interior, please post in the Interior section - and so on... This message can be closed by clicking the X in the top right corner.
  • Car enthusiast? Join us on Cars Connected! iOS | Android | Desktop

After market running board install problem

Yes. Took about two hours. The instruction sheet was pretty accurate and straight forward. Thanks for your help regarding the trimming. On the three smaller screws that previously held the cover by the pinch weld, I didn't trim off the holes on the cover. I placed the nut through the cover onto the the threaded stud so that the cover was secured on on both sides.

1) Removed the lower cover.
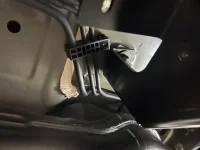
2) Installed the brackets.
3) Tightened up the larger nuts except the 1 smaller bolt and 2 nuts that hold the outside of the cover by the pinch weld.
3) Attached the cover back by the inside (muffler side) bolts. So it hangs making it easier to measure.
4) Lifted the cover up to the brackets, took a sharpie, Drew the bracket lines on the cover and dremmeled out/ cut the covers for the brackets in place.
5) Mounted the outside cover bolts and the last 2 brackets nuts that also hold the cover.
6) Installed the running board with the 6 bolts.

(Mine came with new running board black bolts, but the running board had 6 stainless bolts already mounted. So I used the mounted ones.)

View attachment 23397View attachment 23398View attachment 23399View attachment 23400View attachment 23401
They change the whole look for sure! Great job on getting them installed. 2 hours sounds about right. Doesn’t if feels so good once you’ve accomplished it though 😁🥳
 
They change the whole look for sure! Great job on getting them installed. 2 hours sounds about right. Doesn’t if feels so good once you’ve accomplished it though 😁🥳
OEM mud flaps arrive today. I like that there space to use the mid flaps as wells.

Getting it tinted later in the week. Then we'll be done.
 
OEM mud flaps arrive today. I like that there space to use the mid flaps as wells.

Getting it tinted later in the week. Then we'll be done.
Yes that’s an absolute bonus that there is enough space for the mud flaps. If you don’t mind me asking why OEM and how much did they cost?
 
Yes that’s an absolute bonus that there is enough space for the mud flaps. If you don’t mind me asking why OEM and how much did they cost?
In my opinion, the weather techs are much bigger floppier.

The OEMs are medium size and look cleaner. Like they integrate into the lower cladding of the truck better.

The WT look more like trucking flaps.

Premier Kia on ebay has them shipped for $90 for all 4.

That's the best I could find. Many website have them for less, but one you add the shipping and tax, it was the same as ordering at the dealer.
______________________________
 
Yes that’s an absolute bonus that there is enough space for the mud flaps. If you don’t mind me asking why OEM and how much did they cost?

Installed the mud flaps.

Looks great. I took a few pictures, but it's hard to tell because of how black everything is.

I over-exposed 3 of them so you can see the detail.

Perfect fits.

IMG_20211025_163943__01__01.webpIMG_20211025_163929__01__01.webpIMG_20211025_163919__01.webpIMG_20211025_163929__01.webp
 
Fyi I completely removed mine from the car. No issues yet. I still have them but I don't really see a need to put them back tbh. Most cars don't even have these panels. To me they are just another tray to collect dirt. When I took mine off there was a lot of dirt and dried mud at the bottom sitting inside the panel.

Hmmmm mud flaps....
 
Here is what helped me. I installed all the brackets first and after that I installed the cover back on to help me hold it up then I took a sharpie and traced it so I could make the cuts. That was the hardest part. But the 2nd side I made it easier on myself. What I did was measured the brackets and traced them on the floor made the cuts and after the brackets where on I took the bottom texture piece and tried putting it back on to see if it would clear. If it didn’t I would trace and trim a little more until it was clearly clearing the brackets and it would sit flush. Here are pics of the first bracket. Your brackets looks exactly the same correct?
Yes I sure do. Took a ton of pics.The first bracket extends and it’s the longest. The middle and back bracket are normal size. Hope that makes sense lol. Few different angles from front, middle bracket and the back one.
Thank you for taking the time to post these pics. It’s very helpful! I was rolling smoothly until I got to the rear bracket. There is no post to use as a second anchor point. Does it just anchor in one spot back there?
 

Attachments

  • 332B4026-580D-456F-B254-86FE39A98B1B.webp
    332B4026-580D-456F-B254-86FE39A98B1B.webp
    129.4 KB · Views: 27
  • 8585039F-F616-4962-BA28-E06927C62745.webp
    8585039F-F616-4962-BA28-E06927C62745.webp
    86.9 KB · Views: 27
Okay so are you done with the install or still have the rear bracket to do?
______________________________
 
Okay so are you done with the install or still have the rear bracket to do?
I have all of the brackets installed. I Still have to install the boards, and cut the cover and reinstall it. I’m just unsure if I have the rear bracket mounted correctly. Any help is greatly appreciated.
 
Can you send a pic of the rear bracket installed?


I have all of the brackets installed. I Still have to install the boards, and cut the cover and reinstall it. I’m just unsure if I have the rear bracket mounted correctly. Any help is greatly appreciated.
 
I see what you're asking. The other two brackets has a bolt already in place.

The third bracket required you to reuse one of the bolts you took out.

I personally put the cover on and then inserted the bolt so it would hold the cover in place.
 
I see what you're asking. The other two brackets has a bolt already in place.

The third bracket required you to reuse one of the bolts you took out.

I personally put the cover on and then inserted the bolt so it would hold the cover in place.
That is absolutely correct and I also recommend putting that bolt back in after you install the cover back on so it holds the cover and the bracket at the same time. 👍
______________________________
 
I see what you're asking. The other two brackets has a bolt already in place.

The third bracket required you to reuse one of the bolts you took out.

I personally put the cover on and then inserted the bolt so it would hold the cover in place.
That makes since… I’ll didn’t even think about that. Thanks for your help!
 
That makes since… I’ll didn’t even think about that. Thanks for your help!
The rear post just seems to keep spinning so I’m having trouble ratcheting it down. I got the front and middle done quickly. Any advice on getting the rear bolt plate to stay in place while tightening?
 
The rear post just seems to keep spinning so I’m having trouble ratcheting it down. I got the front and middle done quickly. Any advice on getting the rear bolt plate to stay in place while tightening?
Personally, I wedged my finger between the vehicle frame and the plate and kept tension downward between them as I ratcheted.

The tension kept the "L" bracket from spinning until it was tight.
 
Ha
Personally, I wedged my finger between the vehicle frame and the plate and kept tension downward between them as I ratcheted.

The tension kept the "L" bracket from spinning until it was tig
______________________________
 
Thank you! This would probably be much easier if I had some ramps! I don’t have much space to work with under there. It’s a tight fit on the rear end.
Definitely a tight fit but it can be done. Having some ramps will make it easier to work on for sure. For tightening the L bolts think of it as toggle bolts. Have to add pressure where by pulling on them down tight and then using the ratchet to tighten down the nut. Hope that makes some sense lol 😂
 
Have there been reports of people experiencing a rattle from the under body with the panels trimmed?


Back
Top