-
Are you a Telluride driver - or want to be one? This community is where you belong! Take a moment to sign up and join The Telluride Owners Group today!
-
🔍 Like our community? You can tell Google to show you results from this site more often. Just Click Here and then click the empty checkbox on the right side of our name.
You are using an out of date browser. It may not display this or other websites correctly.
You should upgrade or use an alternative browser.
You should upgrade or use an alternative browser.
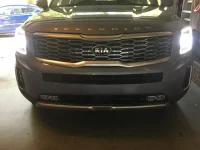
Aftermarket Fog/Driving Light mounting options
- Thread author 2020Telly
- Start date
As an Amazon Associate we earn from qualifying purchases.
Socal949
Well-known member
- Joined
- Feb 24, 2021
- Messages
- 997
- Reaction score
- 438
- Points
- 63
Nice this calls for a video or would you mind sharing what video you used as referenceGot it! I watched a Hyundai grille replacement on YouTube and the professional used a flathead and pried. It made me nervous but as I got one end up it kept getting easier. The rest should be smooth sailing!
 . Can’t wait to see the final product.
Nice this calls for a video or would you mind sharing what video you used as reference
I also took the opportunity to put my DIY radiator screen protectors behind the grille. You can see what 30k miles without the screen protectors does to the fins in the radiator on the previous pic from post #40.
Attachments
Last edited:
Socal949
Well-known member
- Joined
- Feb 24, 2021
- Messages
- 997
- Reaction score
- 438
- Points
- 63
Nice! Yeah I saw those screens on the other pics and I knew exactly what you where doing. Hey I would have done the same. Kill two birds with one stone
I also took the opportunity to put my DIY radiator screen protectors behind the grille.
Would be a perfect time to replace the Kia badge as well if you where thinking of doing it. Since you have easy access to it now. Looks clean and nice. How’s the fitment on the parts?Schmitty88
Member
- Joined
- Sep 1, 2020
- Messages
- 96
- Reaction score
- 64
- Points
- 18
That looks great! Thanks for sharing. Can you show how you are running your switch through the firewall up to the dash or how you are going about hooking up the lights to a switch? Thanks again
I also took the opportunity to put my DIY radiator screen protectors behind the grille.
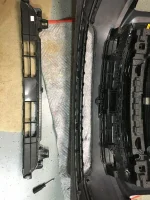
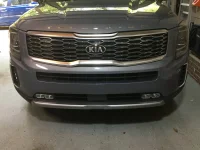
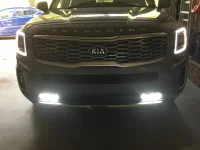
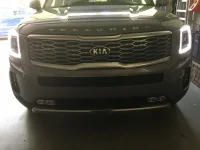
Fitment is perfect! The only “issue” is that I needed to have 8 trim screws to attach the fog lights to the grille insert.
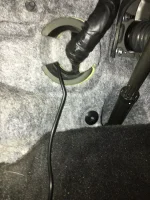
Still need to zip tie the loom and reattach the front. Then I’ll figure out how to put the switch through the firewall.
Still need to zip tie the loom and reattach the front. Then I’ll figure out how to put the switch through the firewall.
Attachments
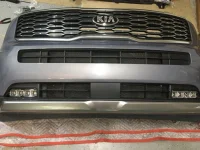
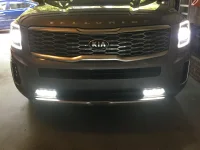
Here’s the finished product . . . for now.
The missing parts for installation were 8 black trim screws. Pretty standard part at any auto parts store.
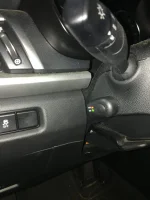
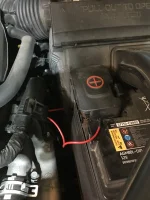
The on/off switch is good enough for now. I have it wired direct to the battery so I can turn them on or off without turning on the vehicle.
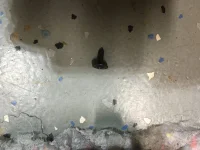
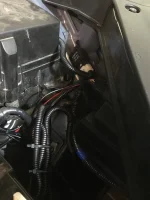
The fit was great! There was even a grounding screw convenient to the left for light placement to ground the relay. I zip tied the relay and pierced a tiny hole in the boot around the vehicle firewall hole.
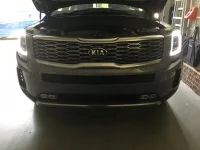
The color matches the white driving lights and my twelvolt led retrofit headlight bulbs. I’ll post at night later.
The missing parts for installation were 8 black trim screws. Pretty standard part at any auto parts store.
The on/off switch is good enough for now. I have it wired direct to the battery so I can turn them on or off without turning on the vehicle.
The fit was great! There was even a grounding screw convenient to the left for light placement to ground the relay. I zip tied the relay and pierced a tiny hole in the boot around the vehicle firewall hole.
The color matches the white driving lights and my twelvolt led retrofit headlight bulbs. I’ll post at night later.
Attachments
-
 7D3BBE5A-492F-435E-A6AA-7A7EA029367B.webp342.5 KB · Views: 240
 -
 AE8E8309-C899-4776-990A-3C618B667C21.webp119.1 KB · Views: 218
 -
 96BC48B3-49EB-459B-B255-A59EBC625E5D.webp154.6 KB · Views: 215
 -
 EFFFFB59-8FED-4853-B403-3492862F4AF3.webp187.5 KB · Views: 201
 -
 B24412E2-BB5B-41BD-A1FE-3CBA31A4A2DE.webp171.2 KB · Views: 199
 -
 CFFE965F-455A-4386-88E0-9DDE821C6BF8.webp140 KB · Views: 195
 -
 30184732-AAFD-4EA6-BB06-D2774A535985.webp118.7 KB · Views: 185
 -
 F8835526-3943-44E3-BD4C-DB4B855D23E1.webp144.7 KB · Views: 183
 -
 0EC4A707-EA63-4913-9456-B4B662BC38D7.webp128.2 KB · Views: 203
 -
 59760999-9967-429D-A17B-1105484A4425.webp199.8 KB · Views: 200
Very nice. The pics and step by step is awesome and they look great.Here’s the finished product . . . for now.
The missing parts for installation were 8 black trim screws. Pretty standard part at any auto parts store.
The on/off switch is good enough for now. I have it wired direct to the battery so I can turn them on or off without turning on the vehicle.
The fit was great! There was even a grounding screw convenient to the left for light placement to ground the relay. I zip tied the relay and pierced a tiny hole in the boot around the vehicle firewall hole.
The color matches the white driving lights and my twelvolt led retrofit headlight bulbs. I’ll post at night later.
Very nice! Thank you for documenting this for us.
Interestingly, you put the switch on the steering column. I have been thinking about where I would place it if I install a set. And, you put it in one of the spots that I was considering (nice to have a visual). From your comment, it looks like the location is only temporary. Where do you want to permanently place it?
Interestingly, you put the switch on the steering column. I have been thinking about where I would place it if I install a set. And, you put it in one of the spots that I was considering (nice to have a visual). From your comment, it looks like the location is only temporary. Where do you want to permanently place it?
I was just thinking I might look for a different type of switch. One thing I forgot to mention, the most time consuming part was taking the plastic skid plate (2 parts) off and putting it back on. That's what used the 10mm screws. I didn't have to take the whole thing off to remove the front fascia but it helped in my opinion.Very nice! Thank you for documenting this for us.
Interestingly, you put the switch on the steering column. I have been thinking about where I would place it if I install a set. And, you put it in one of the spots that I was considering (nice to have a visual). From your comment, it looks like the location is only temporary. Where do you want to permanently place it?
I saw where you had a blank switch plate. One could go there.I was just thinking I might look for a different type of switch. One thing I forgot to mention, the most time consuming part was taking the plastic skid plate (2 parts) off and putting it back on. That's what used the 10mm screws. I didn't have to take the whole thing off to remove the front fascia but it helped in my opinion.
And, I saw the skid plate on the floor. Figured it was part of the procedure.
How long did it take you, start to finish?
I saw where you had a blank switch plate. One could go there.
And, I saw the skid plate on the floor. Figured it was part of the procedure.
How long did it take you, start to finish?
That’s what I was thinking with the blank spot. About 2 hours.
Can you send a pic at night with and without them on. I am gonna work on mine this weekend.Here’s the finished product . . . for now.
The missing parts for installation were 8 black trim screws. Pretty standard part at any auto parts store.
The on/off switch is good enough for now. I have it wired direct to the battery so I can turn them on or off without turning on the vehicle.
The fit was great! There was even a grounding screw convenient to the left for light placement to ground the relay. I zip tied the relay and pierced a tiny hole in the boot around the vehicle firewall hole.
The color matches the white driving lights and my twelvolt led retrofit headlight bulbs. I’ll post at night later.
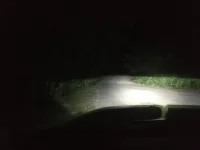

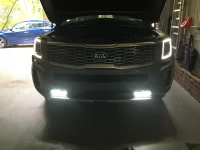
Looks nice. Can’t wait to get mine done.Big difference for me. I’m very satisfied. The foreground and immediate front and sides have more visibility. The pictures don’t even show it well enough.

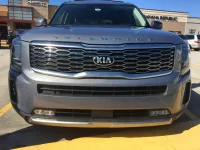
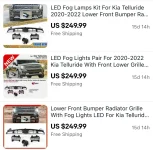
Have you tried all the sellers?Approved!!View attachment 22380
Attachments
LOOKS GOOD!! Who is manufacturer of the lamps? Just wondering who else sells them.Big difference for me. I’m very satisfied. The foreground and immediate front and sides have more visibility. The pictures don’t even show it well enough.
Socal949
Well-known member
- Joined
- Feb 24, 2021
- Messages
- 997
- Reaction score
- 438
- Points
- 63
No I haven’t. I will try them too.Have you tried all the sellers?


