
I just decided to wave off on the hardwired custom puddle light project, using these:
* https://www.amazon.com/dp/B08HJZJRDX?psc=1&ref=ppx_yo2ov_dt_b_product_details
* https://www.amazon.com/dp/B0989H1S1D?psc=1&ref=ppx_yo2ov_dt_b_product_details
* https://www.amazon.com/dp/B072JTWHYX?psc=1&ref=ppx_yo2ov_dt_b_product_details
There's just not enough room inside the door panel to mount the projector. I know I could have dremeled the projector itself to reduce it in size, but I wasn't convinced that even with doing that, the projector wouldn't be mounted at a strange angle that would cause blockage of the light.
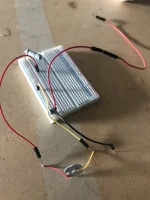
On top of that, I tested out the LED itself, with the required 3W 39 ohm resistor to make it compatible with the 12.6V power source, by breadboarding it and just touching the leads to the battery (picture below). The resistor got uncomfortably hot. I did measure current and it was the expected .24 amps, but still I didn't want that inside the door. It probably would have been fine, but I figured not worth it for just a cute feature.
If you really want to do puddle lights, I would recommend you go with this post: Hardwired Puddle Lights by mrad31. Those LED bolts need much less current (40 mA vs 250 mA), and they are small enough to fit where they need to go as mrad31 demonstrated.
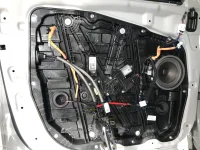
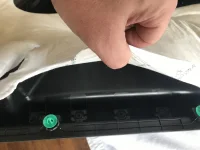
To get the door panel off, remove the small triangle piece of the trim at the top right of the panel, remove the small rubber mat in the door handle, and remove the one screw there. Pop up the panel using a plastic pry tool starting at the bottom right. Once you get the panel completely loose (careful to keep it close to its initial position), remove four wire harnesses and the four screws holding the door handle actuator. Picture below.
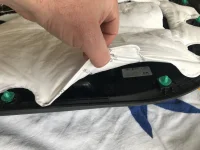
I did trace the wiring, I believe that the wire that would power the new puddle light is one of the bundle running into the door at the bottom left, circled in red in picture.
Hopefully this helps. I figure a report of a failed project is somewhat useful!
* https://www.amazon.com/dp/B08HJZJRDX?psc=1&ref=ppx_yo2ov_dt_b_product_details
* https://www.amazon.com/dp/B0989H1S1D?psc=1&ref=ppx_yo2ov_dt_b_product_details
* https://www.amazon.com/dp/B072JTWHYX?psc=1&ref=ppx_yo2ov_dt_b_product_details
There's just not enough room inside the door panel to mount the projector. I know I could have dremeled the projector itself to reduce it in size, but I wasn't convinced that even with doing that, the projector wouldn't be mounted at a strange angle that would cause blockage of the light.
On top of that, I tested out the LED itself, with the required 3W 39 ohm resistor to make it compatible with the 12.6V power source, by breadboarding it and just touching the leads to the battery (picture below). The resistor got uncomfortably hot. I did measure current and it was the expected .24 amps, but still I didn't want that inside the door. It probably would have been fine, but I figured not worth it for just a cute feature.
If you really want to do puddle lights, I would recommend you go with this post: Hardwired Puddle Lights by mrad31. Those LED bolts need much less current (40 mA vs 250 mA), and they are small enough to fit where they need to go as mrad31 demonstrated.
To get the door panel off, remove the small triangle piece of the trim at the top right of the panel, remove the small rubber mat in the door handle, and remove the one screw there. Pop up the panel using a plastic pry tool starting at the bottom right. Once you get the panel completely loose (careful to keep it close to its initial position), remove four wire harnesses and the four screws holding the door handle actuator. Picture below.
I did trace the wiring, I believe that the wire that would power the new puddle light is one of the bundle running into the door at the bottom left, circled in red in picture.
Hopefully this helps. I figure a report of a failed project is somewhat useful!
Attachments
-
 InkedIMG-3477_LI.webp268.4 KB · Views: 23
 -
 IMG-3479.webp154.8 KB · Views: 21
 -
 IMG-3478.webp102.1 KB · Views: 20
 -
 939C93BC-99CE-4829-A6DD-E7F25EF3E79B.webp145.9 KB · Views: 22
 -
 C7A492C1-DF28-4E86-98B5-7A8B743F0241.webp78.2 KB · Views: 22
 -
 C011BDA5-FBCB-4E0D-97EA-052534969B93.webp134.2 KB · Views: 22
Last edited:


