• Hint: Use a descriptive title for your new message
    If you're looking for help and want to draw people in who can assist you, use a descriptive subject title when posting your message. In other words, "I need help with my SUV" could be about anything and can easily be overlooked by people who can help. However, "I need help with my transmission" will draw interest from people who can help with a transmission specific issue. Be as descriptive as you can. Please also post in the appropriate forum. The "Lounge" is for introducing yourself. If you need help with your leather interior, please post in the Interior section - and so on... This message can be closed by clicking the X in the top right corner.
  • Car enthusiast? Join us on Cars Connected! iOS | Android | Desktop

Installed Proximity Door Lock/Unlock Module

Excited to see a writeup just like this on their ISG/Auto Start/Stop module. Sounds like they are working it but nothing yet.
I installed ISG module on my Stinger but decided not to do one on the Telluride. I didn't see the need as the ISG transition was so smooth on the Telluride that it doesn't bother me like the Stinger did.
I plan to wrap the piano black on the center console come spring time. If no one puts out a guide by then, I can take some pictures when I take it apart. Tracing wires should be a lot simpler as you will be looking for 2 wires going to the ISG switch. 12v should be easy to figure out with a multimeter.
 
Why isn't this standard on the key fob for the price of the car. My last car, 2018 Lexus NX300, had this feature and the car was a 35k purchase, 10k less than than the Telluride!


giphy.gif
 
Did you have the board installed? Does it work as stated?
I haven't picked up the vehicle from the PPF installer yet. I will be doing that tomorrow. We went on Saturday but he had misplaced my temp tag and I had to get another one from the dealer... I will need to make an appointment to do the install.
 
Our UVO subscription is about to expire and I've been looking at installing something to replace the remote start functionality. I like the Accessorides module for the remote start, but there is a CANBUS control module that has been made for other Kia vehicles that I've been holding out for that includes remote start and several other functions, including the auto door locking functionality. So to hear that there is another solution to get the auto door locking functionality is awesome.

Great writeup, sounds very simple and straightforward. What size posi-taps did you use?

Edit: Also, does anyone know if this module will work along with the Accessorides remote start?
______________________________
 
Last edited:
Where does the board go
 
Our UVO subscription is about to expire and I've been looking at installing something to replace the remote start functionality. I like the Accessorides module for the remote start, but there is a CANBUS control module that has been made for other Kia vehicles that I've been holding out for that includes remote start and several other functions, including the auto door locking functionality. So to hear that there is another solution to get the auto door locking functionality is awesome.

Great writeup, sounds very simple and straightforward. What size posi-taps did you use?

Edit: Also, does anyone know if this module will work along with the Accessorides remote start?
20-22 gauge is what I used. Do your research with canbus modules. I looked at installation for Stinger and holy crap that has a lot of wiring. It didn't look like a DIY kind of job. Some of the installers I've contacted did not want to touch it either. I haven't looked at Accessorides install doc, so I am not certain but I don't see why it wouldn't work with this module.
Where does the board go
You can put it anywhere you want. I used tie wrap and fabric taped it with existing wire harness. There is a picture in the install doc, look for a pic with green led showing.
 
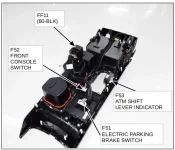
If anyone is looking to install the ISG/Auto Hold module, here are the pin outs. The module is untested(by me) and pin out does not guarantee the module will work.

Location of the connectors. You need F51, and F52
Screenshot from 2020-12-16 18-54-19.png

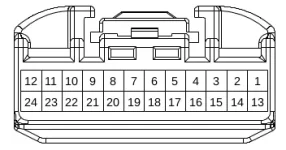
F51 Connector
Pin 4 - Auto Hold
Pin 8 - ISG Switch Signal
Pin 10 - ISG Switch Indicator (Not used for resistor mod or EZLED Module)
Pin 24 - Ground
Screenshot from 2020-12-16 18-45-48.png

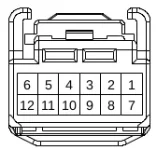
F52 Connector
Pin 3 - 12v Acc
Screenshot from 2020-12-16 18-49-25.png
 
Last edited:
I like the Accessorides module for the remote start, but there is a CANBUS control module that has been made for other Kia vehicles that I've been holding out for that includes remote start and several other functions, including the auto door locking functionality.
so is this a thing yet? These are the 2 features I miss most from my Pilot and would definitely buy both solutions, except if there is a 2in1 solution then that would be killer!
5A8FA05E-E7C7-46A0-972B-093A41B00EED.webp
______________________________
 
so is this a thing yet? These are the 2 features I miss most from my Pilot and would definitely buy both solutions, except if there is a 2in1 solution then that would be killer!
I think he is referring to this module which is not confirmed to work with Telluride yet. The installation is not for the faint of heart even for supported models. Make sure you know what you are getting into before purchase. :)
 
I think he is referring to this module which is not confirmed to work with Telluride yet. The installation is not for the faint of heart even for supported models. Make sure you know what you are getting into before purchase. :)
Correct...that is the module I referenced, not available for the Telluride (and probably won't be). But you aren't the only person I've heard say that the install isn't something for the average Joe to tackle.

I'm trying to get the wife to agree to the two separate modules and drop UVO.
 
I think he is referring to this module which is not confirmed to work with Telluride yet. The installation is not for the faint of heart even for supported models. Make sure you know what you are getting into before purchase. :)
Wow, just went through the manual and that is indeed “next level“ add on capabilities. Since it isn’t even announced as coming soon, I’ll move on to ordering the proximity module and following your guide to install it. Thanks for doing the install guide for us.
 
Last edited:
Does it unlock/lock only driver's door or all locks or settable?

I'll be ordering ASAP.
______________________________
 
Does it unlock/lock only driver's door or all locks or settable?

I'll be ordering ASAP.
It works bit funky with "double press" unlock setting enabled on dash. With it disabled, it locks/unlocks all doors at the same time.
 
It works bit funky with "double press" unlock setting enabled on dash. With it disabled, it locks/unlocks all doors at the same time.
Can you define funky in this context? 🤪
 
Can you define funky in this context? 🤪
I disabled it without even testing it on the Telluride so this is from my experience with Stinger:
It also has been a while so it may not be exactly correct. With double unlock enabled, when you approach the door, driver's door will unlock as it should. To unlock all doors, you have to hit the unlock switch(physical on the door or fob) twice. As if the car did not recognize unlocking via the proximity module. Also approaching the passenger door will only unlock the driver's door(well duh, but was weird to me). Locking works as intended regardless.
 
Thanks.

I could live with that, if there is a passenger, just use the fob. Can't tell you the number of times I've grabbed the handle and pulled, then say to myself why didn't they make it like by bubby's Ram with the unlock sensor inside the handle... proximity will solve it...
______________________________
 
Yes, or a simple touch sensor on the handle would have been much better than the button. H/K started touch sensor on the newer models, so we may see it in future Telluride models.
 
It's literally 4 wires. 2 goes to 12v constant/ground and 2 goes to B-CAN signal. Panels pop off without any tools(plastic trim remover helps) and you need 4 wire taps. I am all dizzy from looking through KGIS finding the CAN wires, so I will post instructions within few days.

This is awesome. Really appreciate the guide @Lith_SXPN! I don't own a Telluride (yet - hopeful to get one in the future), but I love to read DIY projects like this because it shows the creativity people have to overcome/improve things the manufacturer may have overlooked.

I guess you didn't specify it in the guide (and it may be obvious/redundant), but to make your installation guide standalone from this topic, in your "Required Tools" section, perhaps mentioning you need to purchase the B-CAN H L ("Proximity Control Module") from: Proximity Smart Door Lock Module - Various Applications

I was going to ask about the size of the Posi-Tap connectors too, but it appears you addressed that in this topic already (20-22 awg): https://smile.amazon.com/Lockitt-POSI-TAP-pack-connectors-20-22/dp/B001MPW54G/

^ Perhaps include that info/link in the guide would be beneficial as well.

Also for Step 10, did you mean the "Connect 12V red wire to Pin 9..."? Because in your picture of the module, it shows as 12V red write, not a 5V red wire.

Amazing writeup overall. Thank you again for sharing this with the community.

~ Im2bz2p345 :)
Thanks, I've made the changes and here is the updated guide.
 

Attachments


Back
Top