I believe it is matter of preference based on what you are towing as to which side to put the ball. You really just want the trailer to be as close to parallel with the ground.Simple but important question for you all: Anyone know which way the ball should be mounted on the Ball Mount? The diagram from the part is as shown below, which would imply mounting on the top with arch concaved downward, and this looks similar to the white Telluride Brochure in dealerships, but I saw a video from a Kia dealer showing the exact opposite, see below and thanks in advance.
View attachment 3512
View attachment 3513
-
Hint: Use a descriptive title for your new message
If you're looking for help and want to draw people in who can assist you, use a descriptive subject title when posting your message. In other words, "I need help with my SUV" could be about anything and can easily be overlooked by people who can help. However, "I need help with my transmission" will draw interest from people who can help with a transmission specific issue. Be as descriptive as you can. Please also post in the appropriate forum. The "Lounge" is for introducing yourself. If you need help with your leather interior, please post in the Interior section - and so on... This message can be closed by clicking the X in the top right corner. -

You are using an out of date browser. It may not display this or other websites correctly.
You should upgrade or use an alternative browser.
You should upgrade or use an alternative browser.
Trailer Hitch
- Thread author python
- Start date
I believe it is matter of preference based on what you are towing as to which side to put the ball. You really just want the trailer to be as close to parallel with the ground.
Thanks for the info.
lugz
Member
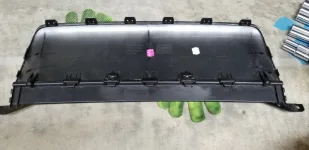
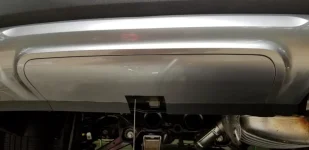
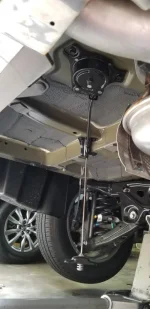
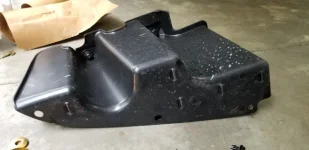
I did the curt hitch and tekonsha harness install yesterday (Curt 13420 hitch, Tekonsha 118784 harness).
It probably took a couple hours in all, including removal of the lower hitch cover and trimming it - it's not a job for the timid. I ended up using a buzz wheel and finished with a file for a cleaner cut.
Some hopefully helpful tips for anyone taking on this project:
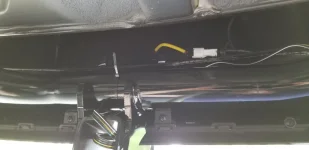
-the winch for the spare is on the rear passenger side. 11mm head, turn clockwise to lower and counterclockwise to raise the spare
-you can access the bolts for the passenger side of the hitch by unhooking the two rear exhaust hangers, but it's a beast getting to the bolts even with exhaust lowered slightly.
-the hitch cover panel can be removed by removing the two push clips, then releasing 4 tabs on the sides. There's also two philips head screws that need to be removed from the support brackets. The remaining 6 clips are then released by pulling the panel straight down (it takes some oompf to remove them.)
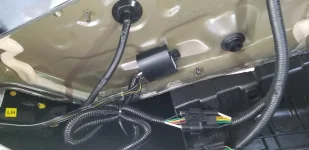
-the Tekonsha harness is listed for a Sorento (IIRC) but it works perfectly. Release the factory harness cap by squeezing the rearmost part of the tab, then pulling the assembly apart.
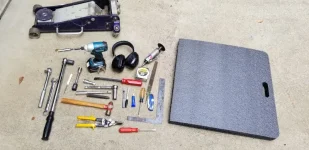
-see pics for tools used. Fasteners are all 11, 17 and 19mm.
-I used loctite blue for all the hitch fasteners, though red may be better. (I just happened to already have some blue in the toolbox so that's what I used.)
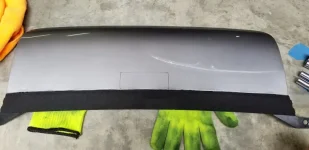
-one other suggestion is to cover the shiny side of the hitch cover panel in blue tape before removing it, as it's easily scratched. I only used blue tape around the cut, but should have done the whole panel since melted plastic went everywhere when I hit it with the buzz wheel.
-the curt instructions say to use tin snips to cut the panel, but I found a buzz wheel worked better. You could also use a dremel with a cutting disc.
It probably took a couple hours in all, including removal of the lower hitch cover and trimming it - it's not a job for the timid. I ended up using a buzz wheel and finished with a file for a cleaner cut.
Some hopefully helpful tips for anyone taking on this project:
-the winch for the spare is on the rear passenger side. 11mm head, turn clockwise to lower and counterclockwise to raise the spare
-you can access the bolts for the passenger side of the hitch by unhooking the two rear exhaust hangers, but it's a beast getting to the bolts even with exhaust lowered slightly.
-the hitch cover panel can be removed by removing the two push clips, then releasing 4 tabs on the sides. There's also two philips head screws that need to be removed from the support brackets. The remaining 6 clips are then released by pulling the panel straight down (it takes some oompf to remove them.)
-the Tekonsha harness is listed for a Sorento (IIRC) but it works perfectly. Release the factory harness cap by squeezing the rearmost part of the tab, then pulling the assembly apart.
-see pics for tools used. Fasteners are all 11, 17 and 19mm.
-I used loctite blue for all the hitch fasteners, though red may be better. (I just happened to already have some blue in the toolbox so that's what I used.)
-one other suggestion is to cover the shiny side of the hitch cover panel in blue tape before removing it, as it's easily scratched. I only used blue tape around the cut, but should have done the whole panel since melted plastic went everywhere when I hit it with the buzz wheel.
-the curt instructions say to use tin snips to cut the panel, but I found a buzz wheel worked better. You could also use a dremel with a cutting disc.
Attachments
-
 20190825_135130_sml.webp40.2 KB · Views: 109
 -
 20190825_135728_sml.webp35.3 KB · Views: 117
 -
 20190825_141049_sml.webp21.3 KB · Views: 117
 -
 20190825_154639_sml.webp79.1 KB · Views: 133
 -
 20190825_154700_sml.webp20.9 KB · Views: 132
 -
 20190825_172807_sml.webp27.7 KB · Views: 135
 -
 20190825_133359_sml.webp29.9 KB · Views: 123
 -
 20190825_132749_sml.webp42 KB · Views: 129
 -
 20190825_133403_sml.webp33.9 KB · Views: 115
Last edited:
G
G-164261
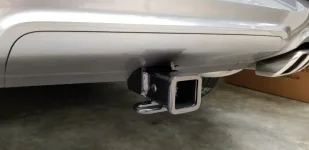
I ordered mine from a dealer here in St. Louis. Installed it myself. Looks great! A week or so after I installed it, I did get a call from an aftermarket dealer here in the area. I had been on his waiting list. He finally received some. I spent a few hundred bucks more from the dealer but it looks factory. I'm glad I spent the extra money.I've been trying to find a trailer hitch for the Telly. You can see it listed as a option in the build but no part number is listed
https://www.kia.com/us/k3/content/m...2020_witch-w-harness--kia-2880x-optns-jpg.jpg
Anyone know how to order one?
______________________________
Thanks for this!! Looking at the pics from the Etrailer site it looked like the receiver protruded out quite a bit, versus the factory set up. Yours looks pretty good though. I'm leaning towards the Curt unless I can get a deal on a factory unit.I did the curt hitch and tekonsha harness install yesterday (Curt 13420 hitch, Tekonsha 118784 harness).
It probably took a couple hours in all, including removal of the lower hitch cover and trimming it - it's not a job for the timid. I ended up using a buzz wheel and finished with a file for a cleaner cut.
Some hopefully helpful tips for anyone taking on this project:
-the winch for the spare is on the rear passenger side. 11mm head, turn clockwise to lower and counterclockwise to raise the spare
-you can access the bolts for the passenger side of the hitch by unhooking the two rear exhaust hangers, but it's a beast getting to the bolts even with exhaust lowered slightly.
-the hitch cover panel can be removed by removing the two push clips, then releasing 4 tabs on the sides. There's also two philips head screws that need to be removed from the support brackets. The remaining 6 clips are then released by pulling the panel straight down (it takes some oompf to remove them.)
-the Tekonsha harness is listed for a Sorento (IIRC) but it works perfectly. Release the factory harness cap by squeezing the rearmost part of the tab, then pulling the assembly apart.
-see pics for tools used. Fasteners are all 11, 17 and 19mm.
-I used loctite blue for all the hitch fasteners, though red may be better. (I just happened to already have some blue in the toolbox so that's what I used.)
-one other suggestion is to cover the shiny side of the hitch cover panel in blue tape before removing it, as it's easily scratched. I only used blue tape around the cut, but should have done the whole panel since melted plastic went everywhere when I hit it with the buzz wheel.
-the curt instructions say to use tin snips to cut the panel, but I found a buzz wheel worked better. You could also use a dremel with a cutting disc.
Crossfire190
New member
- Joined
- Jul 29, 2019
- Messages
- 6
- Reaction score
- 1
- Points
- 3
I did the curt hitch and tekonsha harness install yesterday (Curt 13420 hitch, Tekonsha 118784 harness).
It probably took a couple hours in all, including removal of the lower hitch cover and trimming it - it's not a job for the timid. I ended up using a buzz wheel and finished with a file for a cleaner cut.
Some hopefully helpful tips for anyone taking on this project:
-the winch for the spare is on the rear passenger side. 11mm head, turn clockwise to lower and counterclockwise to raise the spare
-you can access the bolts for the passenger side of the hitch by unhooking the two rear exhaust hangers, but it's a beast getting to the bolts even with exhaust lowered slightly.
-the hitch cover panel can be removed by removing the two push clips, then releasing 4 tabs on the sides. There's also two philips head screws that need to be removed from the support brackets. The remaining 6 clips are then released by pulling the panel straight down (it takes some oompf to remove them.)
-the Tekonsha harness is listed for a Sorento (IIRC) but it works perfectly. Release the factory harness cap by squeezing the rearmost part of the tab, then pulling the assembly apart.
-see pics for tools used. Fasteners are all 11, 17 and 19mm.
-I used loctite blue for all the hitch fasteners, though red may be better. (I just happened to already have some blue in the toolbox so that's what I used.)
-one other suggestion is to cover the shiny side of the hitch cover panel in blue tape before removing it, as it's easily scratched. I only used blue tape around the cut, but should have done the whole panel since melted plastic went everywhere when I hit it with the buzz wheel.
-the curt instructions say to use tin snips to cut the panel, but I found a buzz wheel worked better. You could also use a dremel with a cutting disc.
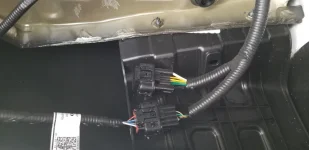
Did you mount the harness? if so, where?
lugz
Member
Did you mount the harness? if so, where?
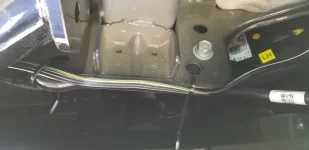
I just stuck the module to a reasonably flat spot on the body with their provided sticky tape. The instructions say to mount the potted part down to avoid moisture, but the factory harness cover will keep most of the water out of that area. The pigtail then got routed over to the hitch area with cable ties (included) avoiding sharp edges. For now I just have the pigtail stuffed into the back side of the receiver. As infrequently as we use our utility trailer (a few times a year) having to fish out the pigtail will be fine for us. I could see where someone would prefer the factory setup with the connection being exposed. I suspect you could probably buy the factory hitch cover and adapt the Tekonsha harness to it. (ASSuming the cover fit with the curt hitch.)
Attachments
Crossfire190
New member
- Joined
- Jul 29, 2019
- Messages
- 6
- Reaction score
- 1
- Points
- 3
I just stuck the module to a reasonably flat spot on the body with their provided sticky tape. The instructions say to mount the potted part down to avoid moisture, but the factory harness cover will keep most of the water out of that area. The pigtail then got routed over to the hitch area with cable ties (included) avoiding sharp edges. For now I just have the pigtail stuffed into the back side of the receiver. As infrequently as we use our utility trailer (a few times a year) having to fish out the pigtail will be fine for us. I could see where someone would prefer the factory setup with the connection being exposed. I suspect you could probably buy the factory hitch cover and adapt the Tekonsha harness to it. (ASSuming the cover fit with the curt hitch.)
Thanks!
______________________________
Interesting option for hitch. Kia Telluride Trailer Hitch (2019 - Present)
lugz
Member
Interesting option for hitch. Kia Telluride Trailer Hitch (2019 - Present)
That's pretty slick. Only downside I can see (I think) is that it doesn't accept standard drawbars.
Thanks for the post looks great, Curt makes great hitches....I think I prefer the cut to the factory cover and FYI Crossfire190, there was a FB post Curt install using the factory cover, it fits fine no issues.I just stuck the module to a reasonably flat spot on the body with their provided sticky tape. The instructions say to mount the potted part down to avoid moisture, but the factory harness cover will keep most of the water out of that area. The pigtail then got routed over to the hitch area with cable ties (included) avoiding sharp edges. For now I just have the pigtail stuffed into the back side of the receiver. As infrequently as we use our utility trailer (a few times a year) having to fish out the pigtail will be fine for us. I could see where someone would prefer the factory setup with the connection being exposed. I suspect you could probably buy the factory hitch cover and adapt the Tekonsha harness to it. (ASSuming the cover fit with the curt hitch.)
Dandy
FOUNDING MEMBER
Yes it does, they have either a hitch or a receiver that will accept a standard drawbar that lock into it. I have highlighted the 2 packages that include this in read and circled the component to recieve normal drawbars. See photo below and/or watch the video on the page linkedThat's pretty slick. Only downside I can see (I think) is that it doesn't accept standard drawbars.
NOTE: This is rated for 350 tongue weight/5000 lbs towing. It will not increase any ratings over the factory hitch

______________________________
lugz
Member
Yes it does, they have either a hitch or a receiver that will accept a standard drawbar that lock into it.
OK, I gotcha. Yeah, that's pretty cool.
Yery nice but $568? OuchInteresting option for hitch. Kia Telluride Trailer Hitch (2019 - Present)
JonFar111
Well-known member
Awesome job!I did the curt hitch and tekonsha harness install yesterday (Curt 13420 hitch, Tekonsha 118784 harness).
It probably took a couple hours in all, including removal of the lower hitch cover and trimming it - it's not a job for the timid. I ended up using a buzz wheel and finished with a file for a cleaner cut.
Some hopefully helpful tips for anyone taking on this project:
-the winch for the spare is on the rear passenger side. 11mm head, turn clockwise to lower and counterclockwise to raise the spare
-you can access the bolts for the passenger side of the hitch by unhooking the two rear exhaust hangers, but it's a beast getting to the bolts even with exhaust lowered slightly.
-the hitch cover panel can be removed by removing the two push clips, then releasing 4 tabs on the sides. There's also two philips head screws that need to be removed from the support brackets. The remaining 6 clips are then released by pulling the panel straight down (it takes some oompf to remove them.)
-the Tekonsha harness is listed for a Sorento (IIRC) but it works perfectly. Release the factory harness cap by squeezing the rearmost part of the tab, then pulling the assembly apart.
-see pics for tools used. Fasteners are all 11, 17 and 19mm.
-I used loctite blue for all the hitch fasteners, though red may be better. (I just happened to already have some blue in the toolbox so that's what I used.)
-one other suggestion is to cover the shiny side of the hitch cover panel in blue tape before removing it, as it's easily scratched. I only used blue tape around the cut, but should have done the whole panel since melted plastic went everywhere when I hit it with the buzz wheel.
-the curt instructions say to use tin snips to cut the panel, but I found a buzz wheel worked better. You could also use a dremel with a cutting disc.
Well, it still requires upgrading to a 7 pin connector, and getting a brake controller installed, but I did receive this response from Kia Consumer Assistance regarding the tongue weight issue...
Thank you for your patience while we review your concern and gather the appropriate information. We have confirmed the correct tongue weight is 500 lbs. Our teams are working to have the owners materials properly updated with this correct information.
Thank you again for allowing us the time to research this. We hope you enjoy your Telluride!
Please let us know if we may be of any further assistance to you.
Sincerely,
Kia Motors America
______________________________
Well, it still requires upgrading to a 7 pin connector, and getting a brake controller installed, but I did receive this response from Kia Consumer Assistance regarding the tongue weight issue...
Thank you for your patience while we review your concern and gather the appropriate information. We have confirmed the correct tongue weight is 500 lbs. Our teams are working to have the owners materials properly updated with this correct information.
Thank you again for allowing us the time to research this. We hope you enjoy your Telluride!
Please let us know if we may be of any further assistance to you.
Sincerely,
Kia Motors America
Well that is good news. Thanks for posting that! I'll keep my eyes out for an update to the manual.
Last edited:
Bjakub82
New member
- Joined
- Jun 18, 2019
- Messages
- 29
- Reaction score
- 23
- Points
- 3
M_B,Well, it still requires upgrading to a 7 pin connector, and getting a brake controller installed, but I did receive this response from Kia Consumer Assistance regarding the tongue weight issue...
Thank you for your patience while we review your concern and gather the appropriate information. We have confirmed the correct tongue weight is 500 lbs. Our teams are working to have the owners materials properly updated with this correct information.
Thank you again for allowing us the time to research this. We hope you enjoy your Telluride!
Please let us know if we may be of any further assistance to you.
Sincerely,
Kia Motors America
Was this an official letter/document or just an email response. Would you mind posting your full corespondents and reply from Kia. Thanks.
Bjakub82
New member
- Joined
- Jun 18, 2019
- Messages
- 29
- Reaction score
- 23
- Points
- 3
M_B,Well, it still requires upgrading to a 7 pin connector, and getting a brake controller installed, but I did receive this response from Kia Consumer Assistance regarding the tongue weight issue...
Thank you for your patience while we review your concern and gather the appropriate information. We have confirmed the correct tongue weight is 500 lbs. Our teams are working to have the owners materials properly updated with this correct information.
Thank you again for allowing us the time to research this. We hope you enjoy your Telluride!
Please let us know if we may be of any further assistance to you.
Sincerely,
Kia Motors America
Do you have a case # you can share that Kia provided you with their communication?
Did you find it? We also need it for our surge breaks on our trailerI need to find the reverse light wire for my surge brakes. Need the reverse light to back up the trailer. The reverse light deactivates the surge brakes.


