• Hint: Use a descriptive title for your new message
    If you're looking for help and want to draw people in who can assist you, use a descriptive subject title when posting your message. In other words, "I need help with my SUV" could be about anything and can easily be overlooked by people who can help. However, "I need help with my transmission" will draw interest from people who can help with a transmission specific issue. Be as descriptive as you can. Please also post in the appropriate forum. The "Lounge" is for introducing yourself. If you need help with your leather interior, please post in the Interior section - and so on... This message can be closed by clicking the X in the top right corner.
  • Car enthusiast? Join us on Cars Connected! iOS | Android | Desktop

DIY - K&N Intake Install

VenomKia

Member
Joined
Mar 28, 2020
Messages
84
Reaction score
63
Points
18
Location
Cincinnati, OH
Good evening, everyone! I hope this helps anyone thinking about or about to install a K&N Intake for their Telly!
***Disclaimer*** - I do not work for K&N or promote the products. I'm just an average joe mechanic and want to help other people. Install at your own risk!

Intake Part Number - 77-5300KS
MSRP: $399.99

Tools Needed:
Flat Blade Screwdriver or 5/16" socket - For intake clamp installation (new)
Phillips Screwdriver - For old intake tube removal of clamps
Small Flat Blade Screwdriver - For Fresh air duct clip removal
Ratchet - 3/8" Drive
10mm Socket (For removing and installing bolts for intake box)
12 mm Socket (For removing and installing battery hold down bracket)
Pliers (for removing clamps on vacuum lines)
4mm Allen Key or Socket (for installing new K&N cap over intake)
3/4" wrench - For installing 90 degree 1/4" NPT into new intake pipe
Cutters - For cutting edge Trim
Tools:
IMG_2249.webp

Step 1:
To save some time, cut edge trim to sizes: 23", 15", 10", 9" and 8.5". Note you will not have excess.
IMG_2250.webp
Step 2:
Using plier remove clamps holding vent lines, and remove lines from intake tube (clamps disconnected in below image)
IMG_2251.webp
Step 3:
Unscrew Intake clamp worms with Phillips Screw driver or 5/16" driver. Remove intake tube. (Intake tube removed below)
IMG_2252.webp
Step 4: Remove fresh air duct with small screw driver and pop the two clips. The center clips pops up and then pull clip out and remove fresh air duct. Save the clips and the air duct, they will be reused.
IMG_2253.webp
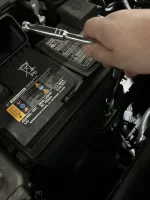
Step 5:Using 12mm socket, remove bolt that holds battery tie down. Slide battery as much far forward towards the front of the car as you can. Note: Instructions want you to disconnect battery cable. Unless you want to reprogram the radio and other stuff, it's not required).
IMG_2254.webp
Step 6:
Using a 10 mm Socket remove two bolts holding down intake box (right behind battery in both corners of the intake box as seen in photos below.) Save bolts for new box install. Pull up on box in the top right corner (by master cylinder) and remove box. Note that if battery is not forward enough, box will hit master cylinder, careful, but box will come out with some movement and ease.
IMG_2257.webp
IMG_2258.webp
Step 7: Prep new K&N box. Install M6 x 12 mm bolt, lock washer, and washer (in that order) with plastic airbox mount from K&N kit on the new airbox. Install edge trim per below on edges of air box.
IMG_2260.webp
 

Attachments

  • IMG_2254.webp
    IMG_2254.webp
    114.5 KB · Views: 17
IMG_2274.JPG
IMG_2275.JPG
Step 8: Install box into car, pushing new airbox mounting post into holder, and reinstalling 10mm bolts removed from old air box, into new. One is on the outside (close to engine) and other 10mm bolt is on the inside of new box. Push battery back into position and reinstall hold down bracket with 14mm socket.
IMG_2262.JPG
IMG_2263.JPG
Step 9: Using new clamp and hose hump from kit, install onto throttle body and tighten clamp
IMG_2261.JPG
Step 10: Take new intake tube from kit, and vent fittins, install the larger fitting in the lower hole of the tube, and the smaller one on the upper hole. Note: K&N sent me the wrong fitting for the upper hole. I'm in the process of getting a new one from them. Make sure both fittings have NPT (National Pipe Thread) on one end of the 90 degree. Tighten with the 3/4in. Wrench. The larger fitting faces the new air box, and the smaller faces the center of the firewall
IMG_2265.JPG
Step 11: Using new clamp from kit, install tube into hose hump, position and tighten down. Make sure that hose hump is not to close to large tube. It may rub. Reinsert tubes and reinstall clamps. Make sure clamps are tight! Note in picture my smaller tube fitting is incorrect. The clamp will not go over the barb.
IMG_2267.JPG
Step 12: Install K&N filter. Note that the filter has a new clamp with it. Push nose of filter into the air box first and then lift and push rubber over tube. Tighten clamp.
IMG_2268.JPG
Step 13: Reinstall fresh air duct. The front pushes into new air box between edge trim. Reinstall push pins. Make sure center is pull out as far as it will go, insert lower part of clip into the hole, and push center to lock in place. Careful not to bend edges of lower clamp!
IMG_2269.JPG
Step 14: Install new intake cap onto new intake box. Using (4) M6-1x12mm bolts, lock washer, and washer. Install on top of box. Tighten securely. The 4mm allen socket works easier than a 4mm allen key, FYI. Done!
IMG_2270.JPG

Results and Conclusion:
The car is really throaty from 1,800 to 4,000 RPM and is slightly louder than stock. You can hear the air rush into the plenum, which is slick. Throttle response is much quicker than anticipated.

Pros:
-Increased gas mileage
-Just need to clean the reusable filter (using K&N's procharger kit)
-Install time: Roughly 45 min. Very easy and straight forward!
-Better Sound!

Cons:
-$399.99 price tag
-The 90 degree fitting was wrong (better control of parts on K&N's part?)
- The filter needs to be oiled, if I match up the size, i'll try to replace with an AEM Dryflow Filter where you just have to wash and let dry.

Overall, worth it. I'll post gas mileage after I refill and go through a whole tank. Now I just wonder what it would sound like with the Borla Exhaust? Wife would kill me! Haha. Enjoy!

Will post sound vid after I upload.
 
Great write up! A drive by sound clip would be nice, when you get the chance.
______________________________
 
Thanks for this, was looking at getting this. Very nice
 
Thanks for posting this. I'm ordering one!
 
Great write up! A drive by sound clip would be nice, when you get the chance.

Thanks, I need to figure out how to do it. I have a GoPro but would take some time. My wife will not help me much (she's not a fan of how it sounds so far). Me, it sounds awesome, very agressive and I have noticed increased throttle response. I actually had an F-150 try to outrun me, but I was able to keep ahead of him, in COMFORT mode instead of SPORT. So yes, the car has some get up and go! That's typical for AWD, from my experience.
 
Thanks, I need to figure out how to do it. I have a GoPro but would take some time. My wife will not help me much (she's not a fan of how it sounds so far). Me, it sounds awesome, very agressive and I have noticed increased throttle response. I actually had an F-150 try to outrun me, but I was able to keep ahead of him, in COMFORT mode instead of SPORT. So yes, the car has some get up and go! That's typical for AWD, from my experience.
I had a 2015 F150 Supercrew 4x4(3.5 ecoboost). I took it to the track for fun. It went 14.1@96. A Telluride (which i own) will not run anywhere near that. You either raced a very base model F150, or a very old F150. The Telluride is an awesome vehicle, but fast/quick it is not. It is adequate.
______________________________
 
I had a 2015 F150 Supercrew 4x4(3.5 ecoboost). I took it to the track for fun. It went 14.1@96. A Telluride (which i own) will not run anywhere near that. You either raced a very base model F150, or a very old F150. The Telluride is an awesome vehicle, but fast/quick it is not. It is adequate.

I just looked it up out of curiosity. Telluride does a standing quarter in 15.4. An F-150 does 14.4. Stock of course, but agree, no way the Telluride intake will knock off .4 seconds. Long days away of ricers and American Muscle for sure, it's dad trucks and mom minivans now! Haha
 
I just looked it up out of curiosity. Telluride does a standing quarter in 15.4. An F-150 does 14.4. Stock of course, but agree, no way the Telluride intake will knock off .4 seconds. Long days away of ricers and American Muscle for sure, it's dad trucks and mom minivans now! Haha
I promise you my truck was bone stock(I've drag raced 8 second cars for years), and it went 14.1@96. I have no reason to lie. 2015, supercrew, 4x4, 3.5 ecoboost, 3.55 gears.
 
I promise you my truck was bone stock(I've drag raced 8 second cars for years), and it went 14.1@96. I have no reason to lie. 2015, supercrew, 4x4, 3.5 ecoboost, 3.55 gears.
Stock tires? I’m not sure if the OEM Ford options are any good, but tires are literally where the rubber meets the road. All the comparisons to stock and any mods to an aftermarket mods to an engine can be negated with bad tires. Two equal Tellurides but better tires on one, I’m certain the results would show that tires make more of a difference than people often realize. That’s why off road tires look very different from street racing ones.
 
Stock tires? I’m not sure if the OEM Ford options are any good, but tires are literally where the rubber meets the road. All the comparisons to stock and any mods to an aftermarket mods to an engine can be negated with bad tires. Two equal Tellurides but better tires on one, I’m certain the results would show that tires make more of a difference than people often realize. That’s why off road tires look very different from street racing ones.
Yes, my truck was on stock tires. It was 100% stock.
______________________________
 
@VenomKia how is your gas mileage looking right now? I would definitely consider this depending on how much it increases by.

Also curious at what folks think a mechanic would charge to do something like this.
 
Got a quote for $100 on the install. I'd be suspect of anyone saying they could do it for cheaper to be honest.

$500 all in for the mod.

Let's hear what the MPG efficiency gain was and take it from there!
 
Got a quote for $100 on the install. I'd be suspect of anyone saying they could do it for cheaper to be honest.

$500 all in for the mod.

Let's hear what the MPG efficiency gain was and take it from there!
Where in NJ? I could help you install it. Would like to hear the sound difference .
______________________________
 
Got a quote for $100 on the install. I'd be suspect of anyone saying they could do it for cheaper to be honest.

$500 all in for the mod.

Let's hear what the MPG efficiency gain was and take
 
If you have a socket set, you can easily install these things. Why pay someone $100 for no reason? I would assume any shop will charge you an hour of shop time. It will take them 15 minutes (maybe).
 
If you have a socket set, you can easily install these things. Why pay someone $100 for no reason? I would assume any shop will charge you an hour of shop time. It will take them 15 minutes (maybe).
Maybe I'll make it a winter project when I'm all couped up in the house.


Back
Top