-
Hint: Use a descriptive title for your new message
If you're looking for help and want to draw people in who can assist you, use a descriptive subject title when posting your message. In other words, "I need help with my SUV" could be about anything and can easily be overlooked by people who can help. However, "I need help with my transmission" will draw interest from people who can help with a transmission specific issue. Be as descriptive as you can. Please also post in the appropriate forum. The "Lounge" is for introducing yourself. If you need help with your leather interior, please post in the Interior section - and so on... This message can be closed by clicking the X in the top right corner. -

You are using an out of date browser. It may not display this or other websites correctly.
You should upgrade or use an alternative browser.
You should upgrade or use an alternative browser.
Comprehensive LED Upgrade Guide with Photos
- Thread author reigndeerz
- Start date
Robert_M
New member
- Joined
- Mar 9, 2021
- Messages
- 15
- Reaction score
- 6
- Points
- 3
Update: installed the reordered Lasfit headlights and they work! Maybe just got a bad one in the first order IDK. But pleased now. Bright.Maybe I just got a bad one. I'm reordering another set, and the Auxitos just to be sure https://www.amazon.com/dp/B07WMG43Q...3AKGFCFE0DNFA?_encoding=UTF8&psc=1&pldnSite=1
Fewturetellyowner
Member
- Joined
- Aug 29, 2020
- Messages
- 91
- Reaction score
- 77
- Points
- 18
I also needed to get a second set, as the first set didn’t work. I am happy with them so far. Only thing I’ve noticed, is when the auto stop/start activates, the lights do flicker a bit. Anyone else notice this?
qwikhit
Well-known member
I haven’t noticed; I’ll try and keep it in mind though
______________________________
Pappy
Active member
That’s normal for all aftermarket LED bulbs. Can’t speak for the stock LED’s though. You could install a resister in the circuit to prevent it, but I haven’t heard of anyone needing to do so.I also needed to get a second set, as the first set didn’t work. I am happy with them so far. Only thing I’ve noticed, is when the auto stop/start activates, the lights do flicker a bit. Anyone else notice this?
I suspect the same thing happens with halogens but it’s much less noticeable due to how they don’t dim as fast when the power cycles on/off. After a while, you don’t really notice it.
Just completed LED upgrades across all the lights on my S Trim and confirmed that it all functions without error codes and hyperflash.
tl;dr
- Front lights changed includes 1) Headlamps, 2) Turn Signal, 3) Side Marker
- Rear lights changed includes: 4) License Plate, 5) Back Up / Reverse, 6) Tail, 7) Brakes, 8) Side Marker, 9) Rear Turn Signal
- Total cost was just over $200, and about 2 to 2.5 hours of work (excluding failure to find the right bulbs)
- On hindsight, I would have not done the side markers (little visual difference) and the rear turn signal (really difficult to install)
Thought I'd document my entire journey here to make it easy for others who might want to embark on a similar journey. Each section includes:
a) LED Bulb Purchased + Cost
b) Ease of Installation
c) Installation Guide
d) My Personal Take
e) Before / After Image
----------------------
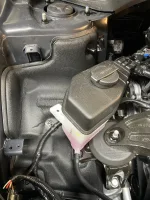
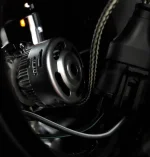
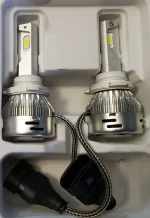
1. Headlamps
a) LED Used: 9005 LASFIT headlights from Amazon ($54.99)
b) Ease of Installation: 5-10 mins
c) Installation Guide: LASFIT YouTube
d) Hot Take: No issue with hyperflash or error codes, would def start with this install as it gives the greatest bang for your buck (visually and ease of installation)
e) Left - Original Halogen, Right - LED
View attachment 13006View attachment 13007
2. Front Turn Signal
a) LED Used: 1157-A Everbright from Amazon ($16.99); H/T: Cacalon on this forum
b) Ease of Installation: 10-15 mins
c) Installation Guide: LASFIT YouTube
d) Hot Take: Use an adjustable wrench to get leverage to twist out the housing
e) Left - Original Halogen, Right - LED
View attachment 13008
3. Front Side Marker
a) LED Used: 194 LASFIT from Amazon ($10.94)
b) Ease of Installation: 10-15 mins
c) Installation Guide: H/T Jazzyone
d) Hot Take: Lowest bang for the buck with very limited visual difference (hence the lack of photos)
4. License Plate
a) LED Used: 194 LASFIT from Amazon ($8.89)
b) Ease of Installation: 5 mins
c) Installation Guide: LASFIT YouTube
d) Hot Take: Easiest installation
e) Left - LED, Right - Original Halogen
View attachment 13011
5. Backup / Reverse
a) LED Used: 912 Auxito from Amazon ($13.99)
b) Ease of Installation: 20-25 mins
c) Installation Guide: LASFIT YouTube
d) Hot Take: It looks more intimidating than it actually is. The visual difference does justify the work required, imo
e) Left - LED, Right - Original Halogen
View attachment 13012
6. Tail
a) LED Used: 1157-R 2 sets of Oxilam on Amazon ($16.99 per set)
b) Ease of Installation: 10-15 mins
c) Installation Guide: H/T itsal
d) Hot Take: Tail lights were easy to change out as part of the "Tail Lamp Assembly" that includes the next 2 lights (Brake and Rear Marker).
e) Left - LED, Right - Original Halogen
View attachment 13014
7. Brake
a) LED Used: 1157-R LASFIT on Amazon ($45.95); Tried ~10 different bulbs on Amazon in the <$20 price range and every single one of them triggered an error code. LEDs tested and failed includes: Oxilam (linked above), 1797, Vehicode, Alla, Phinlion, Auxlight, Auxito, iBrightstar, Luyed, Katur)
b) Ease of Installation: (included in Tail lamp install); Caveat that finding a bulb that worked without triggering error codes was the single most difficult part of replacing this light and took me a full month of back and forth.
c) Installation Guide: H/T itsal
d) Hot Take: Invest in a CANBUS / Error Free bulb as this was the most problematic bulb by far. Luckily this was by far the easiest bulb to swap in and out to test!
e) Left - LED, Right - Original Halogen
View attachment 13015
8. Rear Marker
a) LED Used: 194 LASFIT on Amazon ($10.94)
b) Ease of Installation: (included in Tail lamp install)
c) Installation Guide: H/T itsal
d) Hot Take: Similar to Front Marker, the visual difference is minimal and you'd be swapping out for completeness sake, not for any actual benefits.
9. Rear Turn Signal
a) LED Used: 1157-R Oxilam on Amazon ($16.99)
b) Ease of Installation: 45-60 mins. By far the most difficult to switch out.
c) Installation Guide: H/T firedawg
d) Hot Take: This was REALLY difficult to install and had to be done almost entirely by touch and feel. The screws you have to remove to access the driver side lights are really difficult to remove. I personally would not have done it if not for the time I had already invested and my OCD to complete the project. Use a adjustable wrench to get some leverage to turn the housing, and leave this for last to get familiar with how to install 1157 bulbs by practicing on the other bulbs. I'd also consider installing each bulb in a separate session to avoid driving yourself crazy!
e) Left - LED, Right - Original Halogen
View attachment 13016
reigndeerz this is amazing resource! thanks as it made upgrading the lights in the back a breeze
Awesome write up. I have a 2020 EX and wanted to confirm no need to do anything with wiring harness for headlights? Just swap bulbs? Thank you in advance.Just completed LED upgrades across all the lights on my S Trim and confirmed that it all functions without error codes and hyperflash.
tl;dr
- Front lights changed includes 1) Headlamps, 2) Turn Signal, 3) Side Marker
- Rear lights changed includes: 4) License Plate, 5) Back Up / Reverse, 6) Tail, 7) Brakes, 8) Side Marker, 9) Rear Turn Signal
- Total cost was just over $200, and about 2 to 2.5 hours of work (excluding failure to find the right bulbs)
- On hindsight, I would have not done the side markers (little visual difference) and the rear turn signal (really difficult to install)
Thought I'd document my entire journey here to make it easy for others who might want to embark on a similar journey. Each section includes:
a) LED Bulb Purchased + Cost
b) Ease of Installation
c) Installation Guide
d) My Personal Take
e) Before / After Image
----------------------
1. Headlamps
a) LED Used: 9005 LASFIT headlights from Amazon ($54.99)
b) Ease of Installation: 5-10 mins
c) Installation Guide: LASFIT YouTube
d) Hot Take: No issue with hyperflash or error codes, would def start with this install as it gives the greatest bang for your buck (visually and ease of installation)
e) Left - Original Halogen, Right - LED
View attachment 13006View attachment 13007
2. Front Turn Signal
a) LED Used: 1157-A Everbright from Amazon ($16.99); H/T: Cacalon on this forum
b) Ease of Installation: 10-15 mins
c) Installation Guide: LASFIT YouTube
d) Hot Take: Use an adjustable wrench to get leverage to twist out the housing
e) Left - Original Halogen, Right - LED
View attachment 13008
3. Front Side Marker
a) LED Used: 194 LASFIT from Amazon ($10.94)
b) Ease of Installation: 10-15 mins
c) Installation Guide: H/T Jazzyone
d) Hot Take: Lowest bang for the buck with very limited visual difference (hence the lack of photos)
4. License Plate
a) LED Used: 194 LASFIT from Amazon ($8.89)
b) Ease of Installation: 5 mins
c) Installation Guide: LASFIT YouTube
d) Hot Take: Easiest installation
e) Left - LED, Right - Original Halogen
View attachment 13011
5. Backup / Reverse
a) LED Used: 912 Auxito from Amazon ($13.99)
b) Ease of Installation: 20-25 mins
c) Installation Guide: LASFIT YouTube
d) Hot Take: It looks more intimidating than it actually is. The visual difference does justify the work required, imo
e) Left - LED, Right - Original Halogen
View attachment 13012
6. Tail
a) LED Used: 1157-R 2 sets of Oxilam on Amazon ($16.99 per set)
b) Ease of Installation: 10-15 mins
c) Installation Guide: H/T itsal
d) Hot Take: Tail lights were easy to change out as part of the "Tail Lamp Assembly" that includes the next 2 lights (Brake and Rear Marker).
e) Left - LED, Right - Original Halogen
View attachment 13014
7. Brake
a) LED Used: 1157-R LASFIT on Amazon ($45.95); Tried ~10 different bulbs on Amazon in the <$20 price range and every single one of them triggered an error code. LEDs tested and failed includes: Oxilam (linked above), 1797, Vehicode, Alla, Phinlion, Auxlight, Auxito, iBrightstar, Luyed, Katur)
b) Ease of Installation: (included in Tail lamp install); Caveat that finding a bulb that worked without triggering error codes was the single most difficult part of replacing this light and took me a full month of back and forth.
c) Installation Guide: H/T itsal
d) Hot Take: Invest in a CANBUS / Error Free bulb as this was the most problematic bulb by far. Luckily this was by far the easiest bulb to swap in and out to test!
e) Left - LED, Right - Original Halogen
View attachment 13015
8. Rear Marker
a) LED Used: 194 LASFIT on Amazon ($10.94)
b) Ease of Installation: (included in Tail lamp install)
c) Installation Guide: H/T itsal
d) Hot Take: Similar to Front Marker, the visual difference is minimal and you'd be swapping out for completeness sake, not for any actual benefits.
9. Rear Turn Signal
a) LED Used: 1157-R Oxilam on Amazon ($16.99)
b) Ease of Installation: 45-60 mins. By far the most difficult to switch out.
c) Installation Guide: H/T firedawg
d) Hot Take: This was REALLY difficult to install and had to be done almost entirely by touch and feel. The screws you have to remove to access the driver side lights are really difficult to remove. I personally would not have done it if not for the time I had already invested and my OCD to complete the project. Use a adjustable wrench to get some leverage to turn the housing, and leave this for last to get familiar with how to install 1157 bulbs by practicing on the other bulbs. I'd also consider installing each bulb in a separate session to avoid driving yourself crazy!
e) Left - LED, Right - Original Halogen
View attachment 13016
______________________________
I just finished putting the LASFIT headlights in my 2021 S model . It's relatively simple, remove the OEM Halogen bulbs , replacing them, connecting the factory wires. Apparently you need to remove the 'dust filter' thing in the back of the dust cap, I haven't actually put my dust caps back on yet though, so I haven't fully completed that part yet.Awesome write up. I have a 2020 EX and wanted to confirm no need to do anything with wiring harness for headlights? Just swap bulbs? Thank you in advance.
LED lights require Positive and Negative to be connected correctly, so it may require reversing the connection if they don't light up at first. Also , requires being a little careful not to bend the pins on the bulb connector ( which I guess can also be strighted out if your careful ).
To me, the hardest part was just getting my hand into the area to be able to actually remove the original bulbs , and put the new ones in. There's not a whole lot of room in there for moderate sized hands. It also took me a little while to figure out that the locking ring actually turns, and you have to twist the ring around until it stops in the right spot, before you can correctly put it back in.
The other tricky part is, understanding how to position the bulb for best light pattern, but that too is actually not a difficult thing, just requires a little knowlege.
So... no additional wiring is needed, but it's harder than I originally thought. Not rocket science, but just kinda funky and hard to get your hands in there.

qwikhit
Well-known member
It took me a while to figure out I needed to disconnect the OEM light before removing the one on the right side. I got it to turn, but couldn't pull it out... a few swear words, and eventually I realized.. Hmm, if I disconnected the wires, it might come out.The dust caps are a tight fit. The right light swap I pulled the radiator plastic tank which gave a lot more access
I didn't think about plastic tank removal, I was trying to remove the cover off the top of the light, but that apparently is all connected to the housing. Either way, wow, just a couple more inches in that area would sure make the job easier.
______________________________
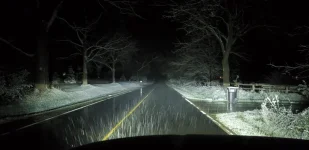
I thought I'd try rotating the LED 180 degrees to see if it made any difference... it does, and it's horrible if you do it. It leaves a huge dark spot at the bottom of the protected light pattern.
So, where mine look the best, in my Telluride... is when the power wire/cable is located at the very bottom.
So, where mine look the best, in my Telluride... is when the power wire/cable is located at the very bottom.
Attachments
Thanks. I did the swap today And was fairly painless. Did find that the fit of the new lights aren’t snug like the ones I removed. Others experiencing this or do I need to work it more?I just finished putting the LASFIT headlights in my 2021 S model . It's relatively simple, remove the OEM Halogen bulbs , replacing them, connecting the factory wires. Apparently you need to remove the 'dust filter' thing in the back of the dust cap, I haven't actually put my dust caps back on yet though, so I haven't fully completed that part yet.
LED lights require Positive and Negative to be connected correctly, so it may require reversing the connection if they don't light up at first. Also , requires being a little careful not to bend the pins on the bulb connector ( which I guess can also be strighted out if your careful ).
To me, the hardest part was just getting my hand into the area to be able to actually remove the original bulbs , and put the new ones in. There's not a whole lot of room in there for moderate sized hands. It also took me a little while to figure out that the locking ring actually turns, and you have to twist the ring around until it stops in the right spot, before you can correctly put it back in.
The other tricky part is, understanding how to position the bulb for best light pattern, but that too is actually not a difficult thing, just requires a little knowlege.
So... no additional wiring is needed, but it's harder than I originally thought. Not rocket science, but just kinda funky and hard to get your hands in there.
I thought I was gonna break the OEM bulb as I was removing it.Thanks. I did the swap today And was fairly painless. Did find that the fit of the new lights aren’t snug like the ones I removed. Others experiencing this or do I need to work it more?
The LASFIT lights seemed tricky to get locked in place or to know for sure they were really locked in. Once I was sure they were actually locked in it was sort of obvious, but being that they rotate even when locked in place, it's just a bit weird.
At first I was sort of reluctant to try the LED headlights, but now that I've got them installed and adjusted... wow, I'm 110% glad I did it. Best $48 I've spent on my Telluride. ( I bought one's that had been returned from Amazon, $44 + tax). Crazy how much better these are than the stock halogen bulbs.
______________________________
Attachments
Thanks. Mine are definitely slightly loose and can rotate so appears I have to play with a bit more. They are secure enough that they don’t blind others. overall, really impressed when compared to the stock halogens!I thought I was gonna break the OEM bulb as I was removing it.
The LASFIT lights seemed tricky to get locked in place or to know for sure they were really locked in. Once I was sure they were actually locked in it was sort of obvious, but being that they rotate even when locked in place, it's just a bit weird.
Robert_M
New member
- Joined
- Mar 9, 2021
- Messages
- 15
- Reaction score
- 6
- Points
- 3
After 2 weeks of use, I can report that the LASFIT bulbs work well and are positioned correctly. We are not getting high beamed by oncoming cars. I cannot comment on the fit or rotation position as I did not install them. Had a professional do it after the first attempt failed (probably my fault).
Yeah, but to be very clear... even when they are correctly locked into their correct position, the bulbs are designed to be able to rotate. The rotation apparently is so that you can adjust the position slightly to get ideal light pattern. I think they will rotate roughly 180 degrees while their mounting point is still fully 'locked' in the correct position.Thanks. Mine are definitely slightly loose and can rotate so appears I have to play with a bit more. They are secure enough that they don’t blind others. overall, really impressed when compared to the stock halogens!
Thanks. Very helpful. Appreciate it.Yeah, but to be very clear... even when they are correctly locked into their correct position, the bulbs are designed to be able to rotate. The rotation apparently is so that you can adjust the position slightly to get ideal light pattern. I think they will rotate roughly 180 degrees while their mounting point is still fully 'locked' in the correct position.