Tellthemride
Well-known member
- Joined
- Oct 6, 2019
- Messages
- 2,669
- Reaction score
- 1,963
- Points
- 113
This DIY will not apply to 2021MY Tellurides since all trims already come standard with factory remote start on the OEM key fob. I am not being paid by Accessorides to write this DIY and review. The sole purpose for this post is to inform other forum members to help them decide if this remote start kit is worth purchasing and installing manually.
The benefit of purchasing and installing the Accessorides remote start are:
Thanks to the help of @bogie for reaching out to Accessorides and getting the discount code (TELLURIDEPRE for 10% off), @rwhite4573, @James216, and @hammick for their help and suggestions that gave me the confidence to tackle the install on my own as well.
A good deal of discussion, tips and reviews already exist on this original thread around post #491, Remote start. I am making this new post to cover the main points we discovered after ordering, installing, and testing the remote start system.
To start, you should head over to the Accessorides website familiarize yourself with the kit options they sell. 2020 KIA Telluride Remote Start Kit - PUSH START ONLY
Info from the website as of August 29th below:
2020 KIA TELLURIDE REMOTE START KIT
The ONLY 100% plug and play remote start kit for the Kia Telluride. Install is simple and comes with easy to follow instructions. This kit will be released in 2 styles. 100% plug and play, and Plug & Play w/ 2 wire hookup.
After remote starting, when approaching the vehicle the 100% plug and play kit will shut off when opening the door/unlocking. (This is the way ALL Toyota/Lexus push start vehicles work). Simply get in, restart, and go!
PLEASE SELECT THE PROPER KIT FROM THE DROPDOWN BOX
OPTION 1: PLUG AND PLAY WITH 2 WIRE CONNECTIONS WITH TAKEOVER: 99% Plug and Play with only 2 wires to manually connect. A very simple install with only 2 wires to manually connect and also provides full takeover. That means you will start the vehicle, and then when walking up you will be able to get in and GO - no need to shutdown or restart!
OPTION 2: 100% PLUG AND PLAY WITHOUT TAKEOVER OPTION: 100% Plug and Play quick easy install no cutting, splicing, etc. This kit will work similar to OEM and does NOT have takeover. That means you will start the vehicle, and then when walking up to get in you press unlock and it will shut off. Simply get in, restart the vehicle, and GO! For those not wanting to connect any wires this option is quick and easy and still gets you into a nice warm vehicle during those winter months. If you prefer to have a normal takeover, see the above option.
If you want to contact their support to make sure you have a compatible Telluride for their kit or inquire about their kits this is their contact info.
support@accessorides.com
1 (877)472-1002
To contact the service provider of the CarLink app or module this is their contact info
Submit a request – VOXX International (ticket support service)
1 (888)644-8882
The cheapest version of the kit would be the OEM fob remote kit non-takeover at $299, takeover only adds $26 more. The most expensive kit is the Smartphone App Control kit with takeover at $475. The Smartphone App Control module can be added on at a later time for $200. Make sure to confirm with Accessorides for compatibility before purchasing.

 accessorides.com
You cannot however, add on the 2-wire take over to a non-takeover kit confirmed via email from Accessorides and also the way the harnesses are set up.
This installation will cover the Smartphone App Control kit with takeover without any extended range fobs. For connecting the 2-wire takeover cables, I used Posi-Taps to tap into the existing wires in the fuse box.
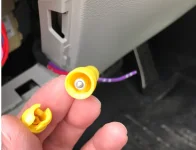
All the wires for takeover are 12 gauge, which will need the yellow size connectors. I bought the assortment pack since I only needed the two.
You may receive a Compustar or Voxx branded control module based on reports by other users. I have the Voxx brand. It took 2 days after placing the order before the kit was shipped and 5 days in transit to receive the kit.

What you will get inside the kit:
The instructions do not really cover how to use the hood safety switch or where to connect the cable on the control module. I did not use it though.
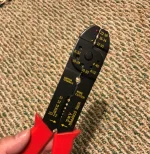
Before starting you will also need wire strippers to expose the 2-wire takeover cable and your posi-taps. A diagonal cutter could work in a pinch, but you would need to be careful not to cut the actual copper wires. Additional tools needed as well if you plan to use the poke & wrap method or soldering to splice the wires together. I used the posi-taps, so a 12 gauge wire stripper was all I needed.

This is an example of the Compustar control module if you receive one. All of the control modules seem to have orange stickers on the bottom.

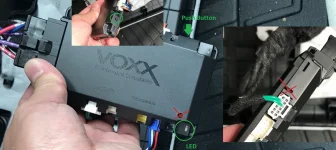
This is an example of the Voxx brand control module.

HARNESS/WIRE SETUP
Follow the instructions provided with the kit.
https://tellurideforum.org/attachments/instructions-accesorides-remote-start-pdf.9153/ (Non-Takeover)
https://tellurideforum.org/attachments/takeover-instructions-pdf.9242/ (Takeover)
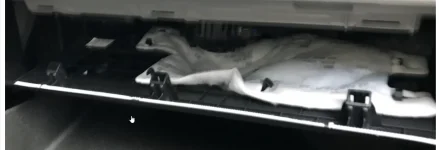
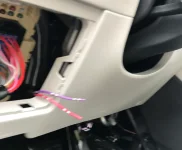
It suggests to remove the glovebox and the plastic cover behind it for better access, but I was able to get the plug and play harnesses installed without removing the glovebox. For some who have larger hands or cannot squeeze their head and shoulders upside down in the passenger footwell, removing the glovebox is probably best. Note that removing just the glovebox gives you a better view of the harnesses from the top as well. I took off just the glovebox later to hide the CarLink module. Follow the Accessorides instructions, pull two pins at the bottom, one pin on the right, and two interior screw caps. Did it all by hand.

Use the trim remover tool if to help pull down the plastic panel under the glove box. I was also just able to do this with my fingers. There are three plastic pins hold it up and two tabs in the back that slide into place.

Once the three clips are fully lowered pull it towards you to remove the panel completely.

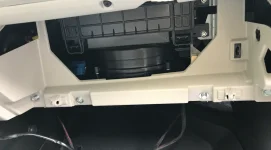
If you take a look at the far right under the glovebox you will see a red, blue and green connector.

Here is the official Accessorides video showing where the plug & play harnesses go:
Reach on the side towards the exterior of the car in the middle of the connector, there will be a release tab. Squeeze the tab and pull to remove the red and green connectors. If it helps, remove the blue connector as well, but I did not need to.

Now plug the existing car connectors to the female end of your plug & play harness matching red to red and green to green. You should hear it click into place. Using the male end of your plug & play harness, plug it back into the slots where the original red and green connectors were. Make sure they are aligned properly so you don’t bend any pins. You should hear a click again when it is secure.

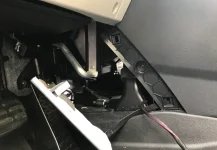
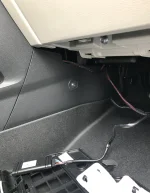
If you only bought the non-takeover unit, you are pretty much done with the wiring part. For the 2-wire takeover though, you will need to route under the center stack and to the fusebox. Start at the bottom of the kick panel (closest to the grab handle side on the floor) on the passenger footwell and pull out towards you. There are only 2 plastic pins holding the panel in place with a third sliding tab holding the farther end of the panel. If you have the interior light kit, remember not to pull the panel too far away, just set it down near the center stack.

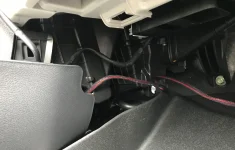
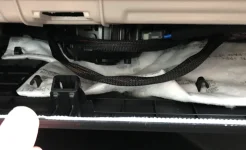
The coolant lines are the metal pipes you can see towards the front of the car. So when routing the wires to the fuse box, just try to stay closer to the grab handle side. After feeding the wire through the middle, go to the driver’s side footwell and remove the kick panel in the same fashion.

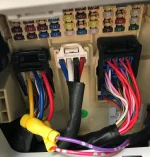
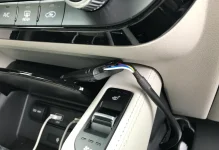
I fished the wire to the right of the heating/cooling vents so that it will stay secured away from the coolant lines. Also visible as metal pipes on this side. Now open the fusebox cover to the left of the steering wheel. There is a knee airbag right below the steering column, so I fished the wire between the two and pulled the wire out the fusebox cover opening.


Now that you have the wires placed where you need them, the next step is to splice the wires into the existing car wiring. As I mentioned before, the instructions from Accesorides recommends using the poke & wrap method or soldering for a solid connection. However, I was able to use the posi-taps with no issue. I can report back in the future if I experience any issues down the road, but I do not anticipate any since the posi-taps really locked the wires into place.
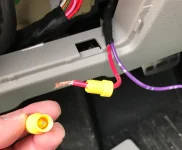
First I striped the insulation from the ends of the 2-wire takeover using the wire stripper I had. To expose about ½ inch of the copper wires

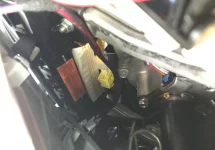
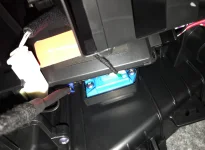
The harness containing the wires you need to splice into is on the left. The yellow and red wires. The yellow wire pairs with the purple and the red to red on the 2-wire takeover.

I tried to position the posi-taps as low as possible, so if I ever need to remove them to return to stock, it would be less noticeable. Maybe even throw some matching electric tap over it. Installing at this lower position was not easy though since there is less space to work. I was able to do it without unplugging any of the cables, but I imagine it would be easier if you did.
This YouTube video did a good job explaining how to install posi-taps.
To start, I first threaded the U-shaped cap around the existing wires in the fusebox. Then I screwed in the main body of the posi-tap so that it pierces the existing wires. Next I unscrew the other end of the posi-tap and fish the 2-wire take over wires through the cap and rest the wire ends inside the posi-tap main body. Finally, I screwed the cap back on to the main body tightly, so that when I tugged on the takeover wires, I was not able to pull them out.


Once you have this completed you are basically done with all the wiring.
PROGRAMMING CONTROL MODULE
Time to program the remote start control module. To do that, first you want to look at the control module for the LED light. To be honest, I had no idea where it was and took two wrong guesses based on the vague descriptions in the instructions that it would be near the “top corner”. The push button was easier to find.

Now that you know where to look and press, start by pressing the push to start button on the car without pressing the brake pedal. This will turn on accessory mode. Press the push to start button again to turn the ignition on. The LED is supposed to turn solid red then solid green for 2 seconds, then off.
Unfortunately for me, I did not look at the correct corner for the LED, so I just waited about 30 seconds and tried it again. The LED would not come on the second time, so I figured it was already programmed, which it was. Turn off the car by pressing push to start a third time and open the drivers side door.
Next step is to start the car. Press on the brake pedal and push to start as you would normally. You don’t need to keep your foot on the brake while you wait 5-10 seconds for the car to adjust to its normal idle speed (RPM) on the tachometer. Once it stops moving, press the brake pedal and hold your foot there. Then press the black button and release it on the remote start control module and look at the LED status lights. The LED will turn red for 2 seconds, then blink green and go out. Your may hear clicking noises from the control module as well, this is normal.
That’s all there is to it! Programming is complete. To start your car while it is off, just press the lock button on your OEM remote three times and it will flash the head lights and tail lights and then start. The DRL and tail lights stay on after the car is started, and the mirrors fold out if you have power folding mirrors. Some additional findings:
Here are examples of the remote start in action:
Non-Takeover
Takeover
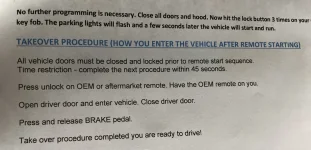
The PDF instructions shared by the other members didn’t have the correct takeover instructions, so here is what was written in my printed instructions. It says there is a 45 second time limit to takeover, which I don’t think is true since I was able to takeover past 45 seconds of unlocking and opening the doors.

The benefit of purchasing and installing the Accessorides remote start are:
- Ability to remote start for 2020 Telluride (US model only) owners that do not have UVO remote start, or do not want to pay a subscription
- Ability to remote start using OEM key fob
- Ability to add extended range key fob up to 3000ft of range and 2-way key fob function that will let you know the car started
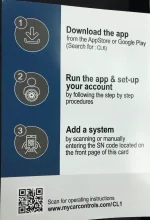
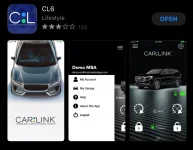
- Cellular remote start function via CarLink app, which is a lot cheaper than UVO subscription, and also faster response time
- 100% plug and play for non-takeover model
Thanks to the help of @bogie for reaching out to Accessorides and getting the discount code (TELLURIDEPRE for 10% off), @rwhite4573, @James216, and @hammick for their help and suggestions that gave me the confidence to tackle the install on my own as well.
A good deal of discussion, tips and reviews already exist on this original thread around post #491, Remote start. I am making this new post to cover the main points we discovered after ordering, installing, and testing the remote start system.
To start, you should head over to the Accessorides website familiarize yourself with the kit options they sell. 2020 KIA Telluride Remote Start Kit - PUSH START ONLY
Info from the website as of August 29th below:
2020 KIA TELLURIDE REMOTE START KIT
The ONLY 100% plug and play remote start kit for the Kia Telluride. Install is simple and comes with easy to follow instructions. This kit will be released in 2 styles. 100% plug and play, and Plug & Play w/ 2 wire hookup.
After remote starting, when approaching the vehicle the 100% plug and play kit will shut off when opening the door/unlocking. (This is the way ALL Toyota/Lexus push start vehicles work). Simply get in, restart, and go!
PLEASE SELECT THE PROPER KIT FROM THE DROPDOWN BOX
OPTION 1: PLUG AND PLAY WITH 2 WIRE CONNECTIONS WITH TAKEOVER: 99% Plug and Play with only 2 wires to manually connect. A very simple install with only 2 wires to manually connect and also provides full takeover. That means you will start the vehicle, and then when walking up you will be able to get in and GO - no need to shutdown or restart!
OPTION 2: 100% PLUG AND PLAY WITHOUT TAKEOVER OPTION: 100% Plug and Play quick easy install no cutting, splicing, etc. This kit will work similar to OEM and does NOT have takeover. That means you will start the vehicle, and then when walking up to get in you press unlock and it will shut off. Simply get in, restart the vehicle, and GO! For those not wanting to connect any wires this option is quick and easy and still gets you into a nice warm vehicle during those winter months. If you prefer to have a normal takeover, see the above option.
- Complete Kit comes with ALL parts necessary
- Simple programming no dealer visit necessary.
- Easy to follow instructions
- Printed installation instructions included.
- 2020 Kia Telluride
- 10th letter of your VIN # must be an L
- Will not work on key start models
- Must be PUSH START ignition.
- Vehicle must have power locks / keyless entry
- Automatic transmission only.
- US made vehicles only will not work on Canadian models
- OEM Remote 3x Lock = No remotes included start by pressing lock 3 times on your current remote.
- 1-Way 1000ft = Comes with (2) 1-Button remote fobs for up to 1200ft range + 3x lock from the OEM remote.
- 2-Way 3000ft = Comes with (1) 1-Button 2-way remote fob and (1) 1-Button 1-Way remote fob for up to 3000ft range + 3x lock from the OEM remote.
- SmartPhone App Control = Start your car from your smartphone from anywhere in the world. First year FREE and then a service plan is required - $39.99/year & 3x lock from the OEM remote fob will work as well. (3 year renewal is $99.95)
If you want to contact their support to make sure you have a compatible Telluride for their kit or inquire about their kits this is their contact info.
support@accessorides.com
1 (877)472-1002
To contact the service provider of the CarLink app or module this is their contact info
Submit a request – VOXX International (ticket support service)
1 (888)644-8882
The cheapest version of the kit would be the OEM fob remote kit non-takeover at $299, takeover only adds $26 more. The most expensive kit is the Smartphone App Control kit with takeover at $475. The Smartphone App Control module can be added on at a later time for $200. Make sure to confirm with Accessorides for compatibility before purchasing.
CarLink Phone App Add On Module Extended Range Upgrade
MyCar Phone App Add On Add Our Phone App module to any compatible system to give yourself virtually unlimited range* from your smart phone! Start your car from almost anywhere. Works with iPhone & Android. First year of service is included $49.95 per year after Includes Vehicle Locator / GPS...
accessorides.com
You cannot however, add on the 2-wire take over to a non-takeover kit confirmed via email from Accessorides and also the way the harnesses are set up.
This installation will cover the Smartphone App Control kit with takeover without any extended range fobs. For connecting the 2-wire takeover cables, I used Posi-Taps to tap into the existing wires in the fuse box.
All the wires for takeover are 12 gauge, which will need the yellow size connectors. I bought the assortment pack since I only needed the two.
Amazon.com: Lockitt POSI-TAP Assortment pack wire connectors 10-22 awg: Automotive
Buy Lockitt POSI-TAP Assortment pack wire connectors 10-22 awg: IDC Electrical - Amazon.com ✓ FREE DELIVERY possible on eligible purchases
www.amazon.com
You may receive a Compustar or Voxx branded control module based on reports by other users. I have the Voxx brand. It took 2 days after placing the order before the kit was shipped and 5 days in transit to receive the kit.
What you will get inside the kit:
- Remote start control module with harnesses (and additional modules) already connected (photo below)
- Instructions for installation
- Plastic trim removal tool
- Hood safety switch and cable
- Gator (spandex face mask)
- Hand sanitizer
- Thank you card, CarLink instructions, Warning sticker to place under hood, Accesorides support contact info
The instructions do not really cover how to use the hood safety switch or where to connect the cable on the control module. I did not use it though.
Before starting you will also need wire strippers to expose the 2-wire takeover cable and your posi-taps. A diagonal cutter could work in a pinch, but you would need to be careful not to cut the actual copper wires. Additional tools needed as well if you plan to use the poke & wrap method or soldering to splice the wires together. I used the posi-taps, so a 12 gauge wire stripper was all I needed.
This is an example of the Compustar control module if you receive one. All of the control modules seem to have orange stickers on the bottom.
This is an example of the Voxx brand control module.
HARNESS/WIRE SETUP
Follow the instructions provided with the kit.
https://tellurideforum.org/attachments/instructions-accesorides-remote-start-pdf.9153/ (Non-Takeover)
https://tellurideforum.org/attachments/takeover-instructions-pdf.9242/ (Takeover)
It suggests to remove the glovebox and the plastic cover behind it for better access, but I was able to get the plug and play harnesses installed without removing the glovebox. For some who have larger hands or cannot squeeze their head and shoulders upside down in the passenger footwell, removing the glovebox is probably best. Note that removing just the glovebox gives you a better view of the harnesses from the top as well. I took off just the glovebox later to hide the CarLink module. Follow the Accessorides instructions, pull two pins at the bottom, one pin on the right, and two interior screw caps. Did it all by hand.
Use the trim remover tool if to help pull down the plastic panel under the glove box. I was also just able to do this with my fingers. There are three plastic pins hold it up and two tabs in the back that slide into place.
Once the three clips are fully lowered pull it towards you to remove the panel completely.
If you take a look at the far right under the glovebox you will see a red, blue and green connector.
Here is the official Accessorides video showing where the plug & play harnesses go:
Reach on the side towards the exterior of the car in the middle of the connector, there will be a release tab. Squeeze the tab and pull to remove the red and green connectors. If it helps, remove the blue connector as well, but I did not need to.
Now plug the existing car connectors to the female end of your plug & play harness matching red to red and green to green. You should hear it click into place. Using the male end of your plug & play harness, plug it back into the slots where the original red and green connectors were. Make sure they are aligned properly so you don’t bend any pins. You should hear a click again when it is secure.
If you only bought the non-takeover unit, you are pretty much done with the wiring part. For the 2-wire takeover though, you will need to route under the center stack and to the fusebox. Start at the bottom of the kick panel (closest to the grab handle side on the floor) on the passenger footwell and pull out towards you. There are only 2 plastic pins holding the panel in place with a third sliding tab holding the farther end of the panel. If you have the interior light kit, remember not to pull the panel too far away, just set it down near the center stack.
The coolant lines are the metal pipes you can see towards the front of the car. So when routing the wires to the fuse box, just try to stay closer to the grab handle side. After feeding the wire through the middle, go to the driver’s side footwell and remove the kick panel in the same fashion.
I fished the wire to the right of the heating/cooling vents so that it will stay secured away from the coolant lines. Also visible as metal pipes on this side. Now open the fusebox cover to the left of the steering wheel. There is a knee airbag right below the steering column, so I fished the wire between the two and pulled the wire out the fusebox cover opening.
Now that you have the wires placed where you need them, the next step is to splice the wires into the existing car wiring. As I mentioned before, the instructions from Accesorides recommends using the poke & wrap method or soldering for a solid connection. However, I was able to use the posi-taps with no issue. I can report back in the future if I experience any issues down the road, but I do not anticipate any since the posi-taps really locked the wires into place.
First I striped the insulation from the ends of the 2-wire takeover using the wire stripper I had. To expose about ½ inch of the copper wires
The harness containing the wires you need to splice into is on the left. The yellow and red wires. The yellow wire pairs with the purple and the red to red on the 2-wire takeover.
I tried to position the posi-taps as low as possible, so if I ever need to remove them to return to stock, it would be less noticeable. Maybe even throw some matching electric tap over it. Installing at this lower position was not easy though since there is less space to work. I was able to do it without unplugging any of the cables, but I imagine it would be easier if you did.
This YouTube video did a good job explaining how to install posi-taps.
To start, I first threaded the U-shaped cap around the existing wires in the fusebox. Then I screwed in the main body of the posi-tap so that it pierces the existing wires. Next I unscrew the other end of the posi-tap and fish the 2-wire take over wires through the cap and rest the wire ends inside the posi-tap main body. Finally, I screwed the cap back on to the main body tightly, so that when I tugged on the takeover wires, I was not able to pull them out.
Once you have this completed you are basically done with all the wiring.
PROGRAMMING CONTROL MODULE
Time to program the remote start control module. To do that, first you want to look at the control module for the LED light. To be honest, I had no idea where it was and took two wrong guesses based on the vague descriptions in the instructions that it would be near the “top corner”. The push button was easier to find.
Now that you know where to look and press, start by pressing the push to start button on the car without pressing the brake pedal. This will turn on accessory mode. Press the push to start button again to turn the ignition on. The LED is supposed to turn solid red then solid green for 2 seconds, then off.
Unfortunately for me, I did not look at the correct corner for the LED, so I just waited about 30 seconds and tried it again. The LED would not come on the second time, so I figured it was already programmed, which it was. Turn off the car by pressing push to start a third time and open the drivers side door.
Next step is to start the car. Press on the brake pedal and push to start as you would normally. You don’t need to keep your foot on the brake while you wait 5-10 seconds for the car to adjust to its normal idle speed (RPM) on the tachometer. Once it stops moving, press the brake pedal and hold your foot there. Then press the black button and release it on the remote start control module and look at the LED status lights. The LED will turn red for 2 seconds, then blink green and go out. Your may hear clicking noises from the control module as well, this is normal.
That’s all there is to it! Programming is complete. To start your car while it is off, just press the lock button on your OEM remote three times and it will flash the head lights and tail lights and then start. The DRL and tail lights stay on after the car is started, and the mirrors fold out if you have power folding mirrors. Some additional findings:
- Your car does not need to be locked when remote starting
- You have to push the lock button on the FOB at the right pace. Half second intervals is too fast. 2 second intervals is too slow.
- Turning off the remote started car is done the same way, 3x press of the lock button
- The HVAC controls will return to whatever settings you last used when turning off the car
- The radio is not on when the car is remote started, only when you step on the brake pedal
- It is normal to see the menu for the headlamps pop up on the instrument cluster when you step on the brake pedal
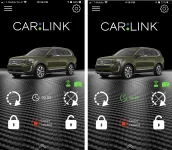
- Based on the CarLink app countdown timer, the remote start will only run for 15 minutes before shutting off
- For non-takeover remote start kits, if you try to use the smart liftgate function or manually open the liftgate using the handle, it will shut off the car. Then the second pull will open the liftgate as normal.
- For takeover remote start kits:
- If you wait about 45 seconds after remote starting, smart liftgate functions should work when you approach the rear liftgate. If you try to pull open the liftgate before this time, it will “unlock” the trunk, then the second pull will actually open the liftgate.
- The car will not auto-takeover like it does with UVO when your remote fob is detected in close proximity after opening a door. This can be a benefit to some, because with UVO remote start, when loading kids or items into the trunk the car frequently shuts off because the remote fob is not close enough to the push to start button to be detected.
- If you try to step on the brake pedal for takeover without the key present, it will shut off the car
Here are examples of the remote start in action:
Non-Takeover
Takeover
The PDF instructions shared by the other members didn’t have the correct takeover instructions, so here is what was written in my printed instructions. It says there is a 45 second time limit to takeover, which I don’t think is true since I was able to takeover past 45 seconds of unlocking and opening the doors.
Last edited:


")


") I got my Posi-taps ready
I got my Posi-taps ready 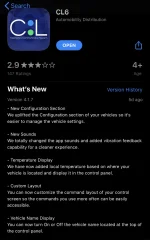


 )
)