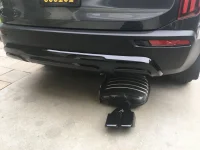
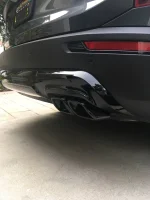
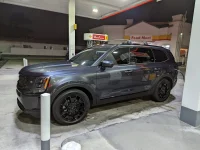
How did you do the exhaust tips?Here is my beauty that was picked up 10/30/21 after a 7 mo wait from Kia of Muncie.
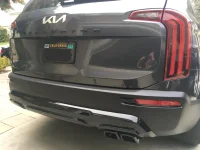
Finally the way we like it.
- Custom 1/10" acrylic Kia logo on back to replace the old
- 20% tint on fronts, 35% over all the rest behind it.
- Medium tinted tail lights, 3rd brake, and reflectors
- Black gloss vinyl over the front Kia logo
- Covered over wheel center caps with a more low profile Kia logo color
- Exhaust tips now black
LOVE the way she turned out.
-
Hint: Use a descriptive title for your new message
If you're looking for help and want to draw people in who can assist you, use a descriptive subject title when posting your message. In other words, "I need help with my SUV" could be about anything and can easily be overlooked by people who can help. However, "I need help with my transmission" will draw interest from people who can help with a transmission specific issue. Be as descriptive as you can. Please also post in the appropriate forum. The "Lounge" is for introducing yourself. If you need help with your leather interior, please post in the Interior section - and so on... This message can be closed by clicking the X in the top right corner. -

You are using an out of date browser. It may not display this or other websites correctly.
You should upgrade or use an alternative browser.
You should upgrade or use an alternative browser.
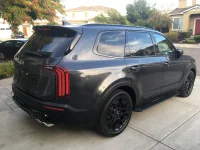
The KIA Telluride in Gravity Grey
- Thread author Sal Collaziano
- Start date
-
- Tags
- gravity grey
arossteven
New member
This is what I did, really helped out my process of painting the exhaust tips gloss black:How did you do the exhaust tips?
Supplies:
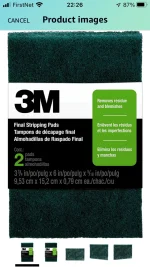
1. Brillo pads, the brand was 3M, any would work, approximately $3.
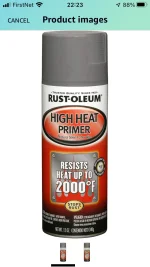
2. Rust-Oleum Flat Gray High Heat Spray Primer, approximately $10.
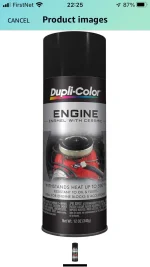
3. Dupli-Color DE1634 Low Gloss Black Engine Enamel with Ceramic, approximately $14.
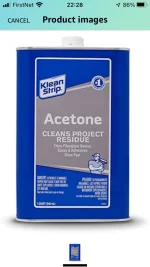
4. Acetone, approximately $10
REMOVE THE EXHAUST:
1. There are 3 different locations that have rubber exhaust "hangers." Grab a bottle of WD40, and spray the male ends that are inserted into the rubber hanger. This will help lube up it up and able you to remove it with less effort as there is very little leverage underneath the vehicle. Get a pair of Locking Pliers, and yank them free. Take a look, there were typically two prongs inserted into the rubber exhaust hanger, one attached to the exhaust side, and one attached to the vehicle side. Remove the one that's attached to the exhaust and leave the one attached to the vehicle in place.
2. Use (I think it was 18 or 19mm) socket wrench, and remove the two bolts that are attached to the exhaust (toward the middle of the vehicle).
3. Pull the exhaust out.
4. Use your brillo pad and scour the chrome exhuast tips and whatever else you may want to paint. This will help the primer to absorb. Be sure to blow away any residue that is left behind. The prep work is the hardest part. Use the Brillo pads to clean all the exhaust buildup that is on the interior of the tips, and on the exterior, you want to "roughen" it up.
5. Use your Acetone on a clean microfiber cloth, and wipe away the interior and exterior of the tips (or whatever you want to paint) until its completely clean and the microfiber no longer gets dirty when wiping.
6. Spray with the Rust-Oleum Primer
7. Spray with the Dupli-Color Gloss Black
8. Be sure to wait for it to dry AND cure. I attempted to put my exhaust back together without it curing, and I scratched the hell out of it while installing.
INSTALLING THE EXHAUST:
It is just the reversal of removal. Be sure to give a quick spray of WD40 to the male end of the prongs on the exhaust, it will help out immensely when inserting into the rubber exhaust hanger grommets.
CURING THE PAINT:
I am no expert, but this helped me and so far I have no paint cracks/peeling/chips.
1. Run vehicle for 10 minutes, let vehicle rest for 10 minutes.
2. Run vehicle for 20 minutes, let it rest for 20 minutes.
3. Run vehicle for 30 minutes, lets it rest for 30 minutes.
You'll smell the paint cooking at first, sort of smells like burt spray paint, but it will eventually go away.
Hope this helps!
arossteven
New member
This is what I did, really helped out my process of painting the exhaust tips gloss black:
Supplies:
1. Brillo pads, the brand was 3M, any would work, approximately $3.
2. Rust-Oleum Flat Gray High Heat Spray Primer, approximately $10.
3. Dupli-Color DE1634 Low Gloss Black Engine Enamel with Ceramic, approximately $14.
4. Acetone, approximately $10
REMOVE THE EXHAUST:
1. There are 3 different locations that have rubber exhaust "hangers." Grab a bottle of WD40, and spray the male ends that are inserted into the rubber hanger. This will help lube up it up and able you to remove it with less effort as there is very little leverage underneath the vehicle. Get a pair of Locking Pliers, and yank them free. Take a look, there were typically two prongs inserted into the rubber exhaust hanger, one attached to the exhaust side, and one attached to the vehicle side. Remove the one that's attached to the exhaust and leave the one attached to the vehicle in place.
2. Use (I think it was 18 or 19mm) socket wrench, and remove the two bolts that are attached to the exhaust (toward the middle of the vehicle).
3. Pull the exhaust out.
4. Use your brillo pad and scour the chrome exhuast tips and whatever else you may want to paint. This will help the primer to absorb. Be sure to blow away any residue that is left behind. The prep work is the hardest part. Use the Brillo pads to clean all the exhaust buildup that is on the interior of the tips, and on the exterior, you want to "roughen" it up.
5. Use your Acetone on a clean microfiber cloth, and wipe away the interior and exterior of the tips (or whatever you want to paint) until its completely clean and the microfiber no longer gets dirty when wiping.
6. Spray with the Rust-Oleum Primer
7. Spray with the Dupli-Color Gloss Black
8. Be sure to wait for it to dry AND cure. I attempted to put my exhaust back together without it curing, and I scratched the hell out of it while installing.
INSTALLING THE EXHAUST:
It is just the reversal of removal. Be sure to give a quick spray of WD40 to the male end of the prongs on the exhaust, it will help out immensely when inserting into the rubber exhaust hanger grommets.
CURING THE PAINT:
I am no expert, but this helped me and so far I have no paint cracks/peeling/chips.
1. Run vehicle for 10 minutes, let vehicle rest for 10 minutes.
2. Run vehicle for 20 minutes, let it rest for 20 minutes.
3. Run vehicle for 30 minutes, lets it rest for 30 minutes.
You'll smell the paint cooking at first, sort of smells like burt spray paint, but it will eventually go away.
Hope this helps!
Attachments
-
 48E76B8C-A9ED-4F2B-8F14-4BC12D34367A.webp110.8 KB · Views: 195
 -
 AFB9D9DC-C3EB-4962-9DF0-4B3ADF8892D9.webp37.8 KB · Views: 141
 -
 DB4C48A4-659E-4463-AF46-4D8F722E124D.webp37.5 KB · Views: 121
 -
 D624A72C-AFEA-47B7-B64A-71C49CF6C328.webp46.2 KB · Views: 154
 -
 D6F8F6D0-2B50-4FD6-BB1C-99C22786D643.webp211.7 KB · Views: 168
 -
 18645FA0-0276-40EC-B5BF-8CF46CAC8FAA.webp130.5 KB · Views: 182
 -
 1BD1BFD9-5B58-4341-BE25-F4F93D212A23.webp162.9 KB · Views: 202
 -
 6E205698-32BE-4DAE-8890-E65A2661D6FA.webp240.4 KB · Views: 203
Awesome! Thanks!
______________________________
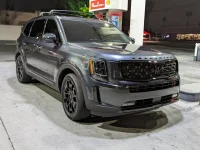
Definitely think the GG Nightfall is the meanest looking color out of all.Picked it up today...was definitely worth the 3 month wait")
GravityNFSX
New member


Matches that orange side marker quite nicely. Was that the goal?I did VHT Orange. I believe it was the flame proof VHT.
That's exactly what I have on order. Love it!Here's some quick snaps I grabbed after taking delivery of our rare GG/Dune combo. I'll be doing paint correction and ceramic coating this weekend.
Really loving the GG paint, has a nice flake in the sunlight. With Nightfall it looks kind of menacing but isn't just all black.

GravityNFSX
New member

 Applied glossy black logo overlays from the forum shop - not 100 percent satisfied with my placement but happy for a few minutes worth of work.
kdstill938
New member
- Joined
- Nov 15, 2021
- Messages
- 25
- Reaction score
- 12
- Points
- 3


EgatsTelly
Member
- Joined
- Jan 22, 2022
- Messages
- 52
- Reaction score
- 26
- Points
- 18

Get butterflies every time I see her!
Pappy
Active member
View attachment 26509
Get butterflies every time I see her!
Nice! I agree, Gravity Grey Nightfall is the best look.


jarova
FOUNDING MEMBER
- Joined
- Apr 8, 2019
- Messages
- 71
- Reaction score
- 59
- Points
- 18
Welcome Hellio to our garage. Our 2020 made the ultimate sacrifice and was totaled saving my wife from a redlight runner. We waited 10 weeks and had to drive 3 hours up and 3 hours back to get her from Ourisman KIA in Chantilly, VA. So happy!

______________________________
thechief16
Member
- Joined
- Nov 19, 2021
- Messages
- 61
- Reaction score
- 17
- Points
- 8
Congrats! I hope you had a better experience with Ourisman than I did (cars at the wrong dealer location, quoted $7500 over MSRP). Can't wait to get mine this summer (fingers crossed).
EgatsTelly
Member
- Joined
- Jan 22, 2022
- Messages
- 52
- Reaction score
- 26
- Points
- 18
The trim around the windows isn’t actually black, so you may choose to approach your black out differently than stock.Going to have my new GG Telly wrapped to look like the Nightfall Edition. Does anyone know if there is a certain color/code/version of black that closely resembles it so I can tell my guy?